You go to drain your Rheem water heater for the yearly flush, and there it is: a hexagonal plug on top that hasn’t moved since the unit was installed. A standard socket won’t grab it, an adjustable wrench just slips, and you’re left wondering if you need to call a plumber for something that should take twenty minutes. That plug is your anode rod, and it’s the single most important sacrificial part in the tank.
This article covers exactly which anode removal tool for Rheem water heaters actually fits, how to use it without rounding the hex head, and what to do when the rod is seized. You’ll also see a comparison of the common socket sizes and drive types, plus answers to the questions homeowners ask most. By the end, you’ll be able to handle this job yourself with confidence.

Skoutag
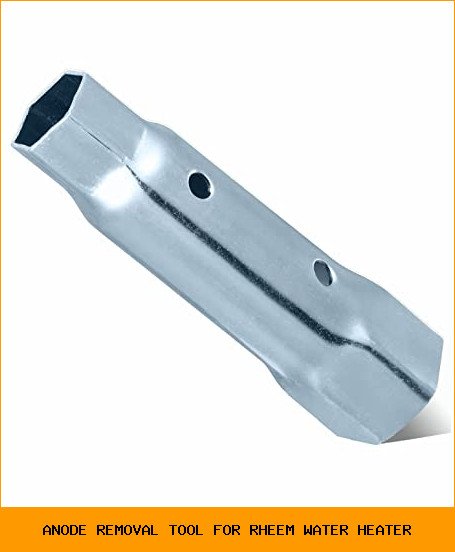
Skoutag RV Water Heater Element Wrench Socket, Dual Hex Wrench Removal Tool for Anode Rod, 1-1/16 in x 1-1/2 in x 6 in, Hex Socket for All Residential and RV Camper Travel Trailer Motorhome
- Skoutag dual hex socket wrench removal tool is made of quality Carbon Steel Galvanized, sturdy and anti-corrosion, specially desig…
- One end size 1-1/2" hex, fits most residential screw-in water heater elements.
- One end size 1-1/16" hex, fits all 3/4" thread anode rods.
One tool that makes this job straightforward is the Skoutag RV Water Heater Element Wrench Socket. It’s a dual hex socket with a 1-1/16 inch end for anode rods and a 1-1/2 inch end for heating elements, so it covers both maintenance tasks with one piece of steel. The 8mm side holes let you insert a screwdriver for extra leverage when a rod is stuck, which is exactly the situation where most people give up.
Why the Anode Rod Matters in a Rheem Tank
Rheem builds glass-lined tanks, but the glass lining isn’t perfect. There are weld seams, fittings, and tiny pinholes where water touches bare steel. Without protection, those spots corrode quickly. The anode rod is a magnesium or aluminum cylinder that corrodes instead of the tank. It’s sacrificial by design.
The rod gets consumed over time. In areas with soft water or high sulfate levels, it can wear out in two years. In moderate water conditions, it might last five or six. Once the rod is gone, the tank starts corroding. That’s why checking it every two to three years is not optional if you want the tank to reach its 10-12 year rated lifespan.
Rheem uses a 3/4-inch NPT thread for the anode on nearly all residential models, both gas and electric. The hex head on the plug is 1-1/16 inch across the flats. That’s the number to remember when you shop for a socket.
Choosing the Right Anode Removal Tool
There are three main ways people try to remove an anode rod: a deep socket on a ratchet, a specialized anode socket, or a breaker bar with the right size socket. The deep socket approach works if you have a 1-1/16 inch six-point socket and a long enough ratchet. The problem is that most home tool sets stop at 1 inch or 15/16 inch, and the anode head is often recessed deeper than a standard socket can reach.
Specialized anode sockets come in two flavors: single hex and dual hex. The single hex versions are just a 1-1/16 inch socket with a long body. The dual hex versions, like the Skoutag tool, add a 1-1/2 inch hex on the opposite end for heating elements. If you own an electric water heater, the dual version saves you from buying a second tool later.
One thing to check before buying: the depth of the socket. The anode plug sits flush with the tank top on most Rheem models, but some newer units have a plastic cover or insulation that requires a deeper reach. The Skoutag socket is 6 inches long, which clears even the thickest insulation without issue.
Another consideration is the drive size. Most anode sockets use a 1/2-inch square drive for the ratchet. Some cheaper ones use 3/8-inch, which is fine for a loose rod but will struggle with a seized one. Stick with 1/2-inch drive and a breaker bar rated for at least 18 inches of length.
Step-by-Step: Removing and Replacing the Anode Rod
Before you start, turn off the water heater. For gas units, set the thermostat to pilot or turn the gas valve off. For electric units, flip the breaker. Then let the water cool for at least an hour. Hot water in a pressurized tank is a burn hazard and a spray hazard.
You’ll need these items:
- 1-1/16 inch six-point socket (or the dual socket mentioned above)
- 1/2-inch drive breaker bar (18 inches or longer)
- Pipe thread sealant or Teflon tape rated for high temperature
- Replacement anode rod (magnesium for most, aluminum/zinc for sulfur-smelling water)
- Garden hose for draining
Here’s the process:
- Turn off the water supply to the heater. There’s a valve on the cold water inlet pipe.
- Open a hot water faucet in the house to relieve pressure. This also lets air into the tank so it drains faster.
- Attach a garden hose to the drain valve at the bottom and run it to a floor drain or outside. Open the valve and drain about 10-15 gallons. You don’t need to empty the tank fully, just lower the water level below the anode port.
- Locate the anode rod on top of the tank. It’s the hex head with a cap or plastic cover on some models. Remove the cover if present.
- Fit the socket over the hex head. Make sure it’s fully seated. A six-point socket grips the corners better than a twelve-point, which is important on a rod that’s been in place for years.
- Attach the breaker bar and turn counterclockwise. If it doesn’t move, apply steady pressure, don’t jerk it. Jerking can round the hex corners.
- If the rod is seized, insert a screwdriver or steel rod through the side holes of the dual socket and use that as a handle. This gives you two hands on the tool and more torque. You can also tap the end of the breaker bar with a mallet, but only lightly.
- Once the rod breaks free, unscrew it by hand. It will be covered in white crust or black goo, that’s normal. It might also have a wire core that’s partially eaten away.
- Clean the threads on the tank port with a wire brush. Remove any old sealant or debris.
- Apply pipe thread sealant to the new rod’s threads. Don’t use Teflon tape alone, it can shred and clog the port.
- Screw the new rod in by hand until it’s snug. Then tighten with the socket and breaker bar. You don’t need to crank it; hand tight plus a quarter turn is enough. Overtightening can crack the tank port.
- Close the drain valve, turn the water supply back on, and open a hot water faucet until water flows steadily. This bleeds air from the tank.
- Restore power or gas, and check for leaks around the anode port after the tank heats up.
Pro tip: if the rod is completely corroded and the head is rounded, you can sometimes drive a screw extractor into the remaining metal. But that’s a last resort. A better move is to replace the rod before it gets that bad.
Comparing Anode Socket Options
Not all anode removal tools are created equal. Here’s a breakdown of the common types and what they’re best for.
| Tool Type | Hex Sizes | Best For | Trade-offs |
|---|---|---|---|
| Standard 1-1/16 deep socket | 1-1/16 inch only | Homeowners who already own a 1/2-inch ratchet set | May not be deep enough for insulated tanks; no built-in leverage holes |
| Dual hex socket (like Skoutag) | 1-1/16 and 1-1/2 inch | RV and residential owners who also need to remove heating elements | Slightly heavier, but covers two jobs |
| Breaker bar with socket attachment | Varies | Seized rods that need maximum torque | Requires buying a separate breaker bar; more storage space |
| Impact driver with socket | 1-1/16 inch | Professional installers who service many units | Risk of cracking the tank port if used carelessly |
For a typical homeowner, the dual hex socket is the practical pick. It handles the anode and the heating element, which means you’ll never be stuck without the right tool when doing annual maintenance. The leverage holes on the side are not a gimmick; they genuinely help when a rod hasn’t been touched in five years.
Common Mistakes and How to Avoid Them
The first mistake is using a twelve-point socket. Twelve-point sockets slip on rounded corners, and once the hex head is rounded, removal becomes a nightmare. Always use a six-point socket.
The second mistake is not draining the tank before removal. If the tank is full, water will pour out of the anode port the moment you loosen the rod. It’s not just messy, it’s hot and potentially dangerous. Drain at least a quarter of the tank first.
The third mistake is over-tightening the new rod. The port is welded to the tank, and the metal is thin. Crank too hard and you can crack it, which means a new water heater. Hand tight plus a quarter turn is the rule.
One more thing: don’t skip the thread sealant. The anode port is a metal-to-metal seal, and without sealant, it will weep water slowly. That leak will eventually rust the top of the tank and void your warranty.
Frequently Asked Questions
What size socket do I need for a Rheem water heater anode rod?
You need a 1-1/16 inch six-point socket. That size fits the hex head on the 3/4-inch NPT anode rod used in virtually all Rheem residential water heaters. Some commercial units use a larger hex, but for home models, 1-1/16 is the standard.
Can I use a regular socket wrench to remove the anode rod?
Yes, if you have a 1/2-inch drive ratchet and a 1-1/16 inch deep socket. The issue is leverage. A standard ratchet is about 10 inches long, which may not be enough to break a seized rod free. A breaker bar with an 18-inch handle gives you much more torque without risking injury.
How do I know if my anode rod needs replacing?
Pull it out and look at it. If the core wire is exposed and the magnesium or aluminum is eaten down to less than 1/4 inch thick, replace it. If you see chunks missing or the rod looks like a twisted wire skeleton, it’s long overdue. Some rods also have a distinctive rotten egg smell when they’re depleted, caused by sulfate-reducing bacteria.
Is it safe to use an impact wrench on the anode rod?
It’s safe if you’re careful. Use the impact only to break the rod loose, then switch to hand tools. The risk is that an impact driver can crack the tank port if you keep hammering on it. Also, use a six-point impact socket, not a chrome socket, because chrome can shatter under impact.
What’s the difference between magnesium and aluminum anode rods?
Magnesium rods protect better and are preferred for most residential tanks, but they react faster and can cause a sulfur smell in some water conditions. Aluminum/zinc rods are cheaper and last longer, but they’re slightly less effective at protecting the tank. If you have smelly water, switch to aluminum/zinc. Otherwise, stick with magnesium.
What to Remember for Next Time
You don’t need a full toolbox to maintain a Rheem water heater. One good anode removal tool, a breaker bar, and a new rod are all it takes. Here’s the short list to keep in your head:
- Check the anode rod every two years, especially if you have soft water or a well system.
- Use a 1-1/16 inch six-point socket, never twelve-point.
- Drain the tank below the anode port before removal to avoid hot water spray.
- Break the rod loose with a breaker bar, not a ratchet, to avoid rounding the head.
- Apply pipe thread sealant to the new rod and tighten hand tight plus a quarter turn.
- If the rod is seized, use the side holes on the socket for extra leverage with a screwdriver.
- Replace the rod when the core wire is visible or the metal is less than 1/4 inch thick.
An anode rod costs about twenty dollars. A water heater costs six hundred or more. The math is simple, and with the right tool, the job takes less than an hour. The Skoutag dual hex socket is a solid choice because it covers both the anode and the heating element, so you’re prepared for whatever the tank throws at you. Check the current price on Amazon and keep it in your garage; you’ll use it more often than you think.


