Installing a wet sauna can be a rewarding home improvement project, providing a personal retreat for relaxation and wellness. However, one crucial aspect often overlooked is the plumbing, specifically the drain. A properly installed drain system ensures that excess water is efficiently removed, reducing the risk of water damage and maintaining a clean environment. This article will guide you through the steps to rough in plumbing for an indoor wet sauna drain, ensuring you have a functional and effective setup.
As you prepare for your sauna installation, consider using a quality Freestanding Tub Drain Rough-in Kit with PVC Adapter from GNRZZT. This kit is designed for easy installation and secure drainage, making it an excellent choice for your sauna project. It includes everything you need, from a drain body to a PVC adapter, providing reliable performance for your sauna’s plumbing needs.
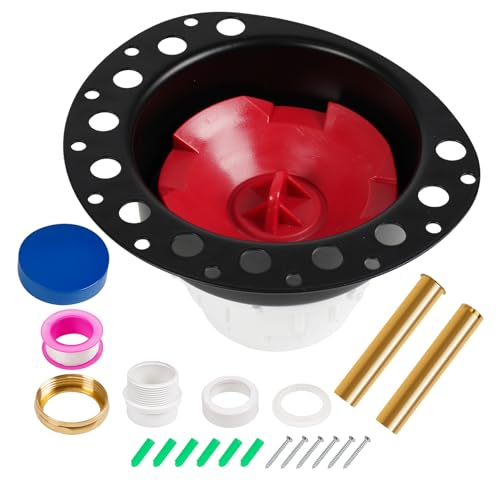
GNRZZT
Freestanding Tub Drain Rough-in Kit with PVC Adapter, Bathtub Drain Kit | Free Standing Tub Drain Kit with Brass Tail Pipes, Suitable for All Freestanding Bathtub, Floor-Mounted, and Copper Bathtubs
- Wide Application:This Freestanding Tub Drain Rough-in Kit is compatible with various freestanding bathtubs, including floor bathtu…
- Secure Drop-in Drain System: The drain kit for freestanding tub installs securely between the subfloor and surface tiles, ensuring…
- PVC Adapter Included: The PVC plastic adapter connects the rough-in to PVC bath waste systems for a quick, easy, and clean install…

Understanding the Basics of Wet Sauna Drainage
Before starting your plumbing project, it’s essential to understand the purpose and function of the drain. A wet sauna generates significant moisture, requiring an efficient drainage system to handle the water that collects on the floor. A well-placed drain prevents pooling and potential water damage to your flooring and subfloor.
The ideal location for your sauna drain is usually at the lowest point of the floor. This allows gravity to assist in directing water towards the drain. The drain must be installed at the correct slope to ensure effective drainage. Typically, a slope of 1/4 inch per foot towards the drain is recommended, allowing water to flow freely without pooling.
Choosing the Right Materials and Tools
For a successful rough-in plumbing project, select high-quality materials. You’ll need:
- Drainage Pipe: Use PVC or ABS pipes, as they are durable and resistant to corrosion.
- Drain Assembly: The drain assembly should be compatible with your sauna’s design. Consider the GNRZZT Freestanding Tub Drain Rough-in Kit for its compatibility with various bathtub styles.
- Fittings: Use appropriate fittings to connect pipes and adapt to your existing plumbing system.
- Tools: A saw for cutting pipes, a wrench for tightening fittings, and a level to ensure proper slope.
Ensure you have a plan before starting your installation. This includes knowing local plumbing codes and regulations, which can vary. Familiarizing yourself with these guidelines can save time and prevent costly mistakes.
Step-by-Step Guide to Rough In Plumbing for Your Sauna Drain
Follow these steps to ensure a successful rough-in plumbing installation:
- Plan Your Layout: Sketch a layout of your sauna, indicating where the drain will be placed. Ensure the drain is positioned at the lowest point of the floor.
- Prepare the Subfloor: Remove existing flooring materials in the area where the drain will go. Ensure the subfloor is clean and level.
- Install the Drain Body: Follow the instructions provided with the GNRZZT kit to install the drain body. Secure it between the subfloor and surface tiles. Make sure it’s level and positioned correctly.
- Connect the Drainage Pipe: Use PVC or ABS piping to connect the drain body to your home’s plumbing system. Ensure all connections are tight, using appropriate fittings as needed.
- Test for Leaks: Before closing up the floor, test the system by running water through the drain. Check for leaks and ensure that water flows smoothly.
- Finish the Flooring: Once testing is complete, proceed with installing your chosen flooring material over the drain.
Always consult a professional if you’re unsure about any step in the process. Mistakes in plumbing can lead to significant issues down the line.
Comparative Overview of Drainage Options
| Drain Type | Material | Installation Difficulty | Cost Range | Best Use |
|---|---|---|---|---|
| Traditional Floor Drain | Metal | Medium | $50-$150 | General Use |
| Trench Drain | Polymer | High | $100-$300 | High Water Areas |
| Freestanding Tub Drain Kit | PVC | Low | $30-$80 | Freestanding Saunas |
Selecting the right type of drain depends on your sauna’s design and your plumbing configuration. The GNRZZT Freestanding Tub Drain Rough-in Kit offers a straightforward solution for most indoor wet sauna installations.
FAQs About Plumbing for Indoor Wet Saunas
1. What size drain should I install for my sauna?
A 2-inch drain is typically sufficient for most residential saunas. It handles regular water flow without clogging.
2. How do I ensure proper drainage in my sauna?
Maintain a slope of 1/4 inch per foot towards the drain. This slope allows gravity to assist in water flow.
3. Can I install a sauna drain myself?
Yes, if you have basic plumbing skills and tools. However, consider hiring a professional if you’re unfamiliar with plumbing codes.
4. What materials are best for a sauna drain?
PVC is often recommended for its resistance to moisture and ease of installation. Metal options are also available but can corrode over time.
5. How often should I check my sauna drain for clogs?
Inspect the drain monthly for debris. Regular cleaning helps prevent clogs and ensures efficient drainage.
Final Thoughts
- Plan your drainage layout carefully for optimal water removal.
- Use quality materials, like PVC, for durability.
- Follow a proper installation process, including testing for leaks.
- Consider the slope of your floor to ensure efficient drainage.
- Regular maintenance is key to preventing clogs and ensuring longevity.
- Explore options like the Freestanding Tub Drain Rough-in Kit for easy installation.
- Consult a professional if needed to ensure compliance with local codes.