You set up camp, flip on the water heater, and wait. Five minutes pass. Ten. The water comes out lukewarm at best. Then you notice a loud rumbling or knocking sound when the burner kicks on. That noise is a clear signal: sediment has built up in your RV water heater tank.
Most RV owners know they need to flush the tank, but they don’t know how to do it right. They crack the drain valve, watch a little rusty water dribble out, and call it done. That barely touches the problem. Heavy mineral deposits — especially calcium and magnesium — cement themselves to the bottom of the tank. Drain flushing alone won’t budge them.

SEDIMENT GONE
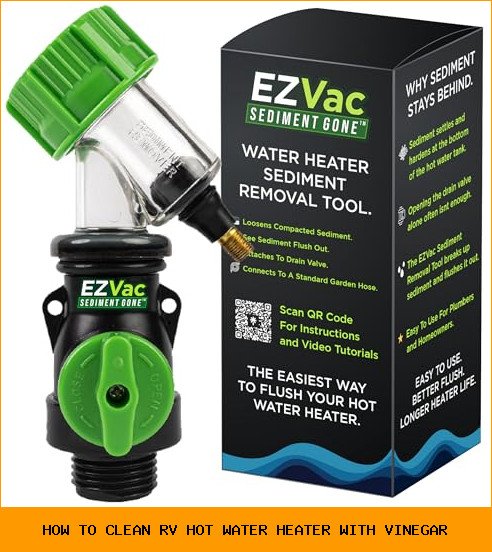
The Original Sediment Gone™ Water Heater Flush Kit & Sediment Removal Tool | DIY hot water heater flush kit, NO plumber needed, Gas or electric tanks, clear window to watch Sediment flush out, 3/4 NPT
- WATER HEATER SEDIMENT REMOVAL TOOL – The Sediment Gone hot water heater flush kit is designed to stir, loosen, and flush out stubb…
- HOW IT WORKS – The Sediment Gone Tool threads onto the water heater drain valve and connects to a standard garden hose for control…
- BENEFITS OF REMOVING SEDIMENT – Flushing out sediment helps maintain heating efficiency, improve water quality, reduce the risk of…
This article walks you through exactly how to clean an RV hot water heater with vinegar, including the mixture ratio, soak time, and the tool that makes the job actually effective. You’ll also learn two big misconceptions that cause people to damage their heaters or waste their time.
One tool that saves a ton of frustration is the Sediment Gone Water Heater Sediment Removal Tool. Instead of just draining, it lets you inject short bursts of air into the tank to stir up compacted sediment. Air agitation breaks apart the packed layer that gravity alone leaves behind. The transparent window on the tool shows you exactly when the water runs clear, so you’re not guessing whether you’re done.
Why Vinegar Works — and the First Big Misconception
Vinegar is a mild acid — acetic acid, around 5% in most white vinegar. It dissolves calcium carbonate and magnesium carbonate, the two minerals that form scale. That’s chemistry. So vinegar flushing absolutely helps.
But here’s the misconception: many people think pouring vinegar in, letting it sit overnight, and then draining is enough. It isn’t. Vinegar can only reach the surface of the sediment layer. If you have a half-inch of hardened scale on the tank floor, the vinegar will soften the top millimeter or so. The rest stays put. That’s why agitation is critical.
The Sediment Gone tool solves this directly. As you pump air through the drain valve, the bubbles create turbulence that lifts loose particles and exposes new surfaces to the vinegar. Without that stirring, you’re basically letting the acid sit on top of a crust.
If you do not have an agitator tool, you can still improve your vinegar flush by shaking the RV or rocking it manually — not practical for most people. A better bet is to use the Sediment Gone or a similar air-injection method.
Step-by-Step: How to Clean Your RV Water Heater with Vinegar
Let’s get specific. The procedure below works for a standard 6- or 10-gallon RV tank. Tankless units have a different process (more on that in the FAQ).
What you’ll need
- White distilled vinegar (gallon jugs) — enough to fill the tank halfway. A 6-gallon tank needs about 3 gallons.
- Garden hose with a shutoff valve
- Water heater bypass kit (most RVs have one installed, or you install one)
- Sediment Gone tool (or another air-agitation kit)
- Bicycle pump or small hand pump
- Bucket or drain line to aim water away
The process
- Turn off the water heater — gas or electric. Let it cool for at least an hour. Hot vinegar inside a hot tank is dangerous and can flash-boil when you open the pressure relief valve.
- Relieve tank pressure by pulling the pressure and temperature relief (P&T) valve lever. Stand back — hot water will shoot out.
- Close the cold water inlet valve and open a hot water faucet inside the RV to let air in.
- Drain the tank by opening the drain valve. Let it flow until water stops.
- Close the drain valve. Remove the drain plug or open the drain port.
- Pour vinegar in. Use a funnel and a hose to fill the tank to about halfway. Don’t fill it completely — you need headroom for the vinegar to slosh. Close the drain valve again.
- Attach the Sediment Gone tool (or a garden hose with a Y-connector) to the drain port. Connect a hand pump to the air inlet.
- Let it soak for 3 to 6 hours. Shorter if the tank is less scaled, longer if you know you’ve neglected it. Every 30 minutes, give 10–20 short air bursts with the pump. The bubbles will circulate vinegar against the scale.
- Drain and flush. Open the drain valve with the Sediment Gone still attached. Watch the transparent window — you’ll see cloudy white vinegar and chunks of sediment flowing out. When it runs clear, the acid is spent.
- Fill and rinse. Close the drain, open the cold water supply, and let the tank fill. Drain again. Repeat until the water runs clear and smells only faintly of vinegar.
- Return to service. Close the bypass valves, open the hot water faucet to purge air, and turn the water heater back on.
This whole job takes about 4–7 hours, mostly waiting for the soak. The active time is maybe 45 minutes.
Second Misconception: ‘I Can Just Drain and Refill — No Vinegar Needed’
Some RV maintenance advice says a simple cold-water flush every spring is sufficient. That’s true for tanks that get drained after every trip and have soft water. But most RV water heaters face hard well water, and the scale builds up over years.
A plain water flush removes the loose grit that hasn’t hardened yet. The hard, cemented scale stays. Over time, that scale insulates the water from the heat source, making the heater work harder. It also traps corrosive debris against the tank wall. Many premature tank failures trace back to neglected scale buildup, not a manufacturing defect.
Vinegar dissolves the scale. An air-agitation tool like Sediment Gone ensures the vinegar reaches every part of the scale. Plain draining doesn’t dissolve anything. It just washes out the easy stuff.
Here’s a comparison of the common methods:
| Method | Removes loose sediment | Removes hardened scale | Tools needed | Time investment |
|---|---|---|---|---|
| Plain water flush (drain only) | Partially | No | Garden hose | 15 min |
| Vinegar soak + drain | Yes | Partially (surface only) | Vinegar, funnel, hose | 3-6 hrs soak |
| Vinegar soak + air agitation (Sediment Gone) | Yes | Yes (deep penetration) | Vinegar, Sediment Gone, pump | 3-6 hrs soak + 10 min active |
| Commercial descaler (acid-based) | Yes | Yes | Descaler, pump, hose | 30 min – 2 hrs |
Notice the middle row — vinegar soak without agitation only partially works. You get a mild improvement. The bottom two rows get the job done. Commercial descalers (like phosphoric acid formulas) work faster but cost more and can be harsher on brass fittings. Vinegar is cheaper, safer, and easier on components.
When Not to Use Vinegar
Vinegar is almost universally safe for porcelain-lined steel tanks, which cover 95% of RV water heaters. But there are exceptions:
- Aluminum tanks. Some older or European RVs use aluminum tanks. Acetic acid corrodes aluminum. Check your owner’s manual. If you have an aluminum tank, use a citric acid–based descaler instead.
- Tankless water heaters. Tankless units have narrow copper heat exchangers. Vinegar can be used, but you cannot let it sit. You need to recirculate it with a pump for 15–30 minutes, then flush thoroughly. Soaking a tankless can cause the acid to eat through the tube walls.
- Anode rods. Vinegar doesn’t harm the anode rod itself (made of aluminum, magnesium, or zinc), but the natural reaction between the two different metals can weaken the rod over many cycles. It’s a minor concern — just replace the rod every couple of years regardless.
The most common mistake people make is using hot vinegar. Do not heat the vinegar. Room temperature is fine. Hot vinegar speeds up corrosion and can produce fumes that are unpleasant.
Frequently Asked Questions
Can I use apple cider vinegar instead of white vinegar?
Technically yes — both contain acetic acid. Apple cider vinegar is about 5% acid, same as white. But white vinegar is cheaper, has no sugar residues, and leaves no odor. Apple cider vinegar can leave a sticky film if not fully flushed. Stick with plain white distilled vinegar.
How often should I clean my RV water heater with vinegar?
If you use the RV full-time or have hard water, do a vinegar flush once a year. If you only camp a few weekends a year, every two years is fine. A good rule: when you hear the rumbling noise or notice slower hot water recovery, it’s time. Don’t wait for a total failure.
Will vinegar damage the heating element or gas burner?
No. The heating element (electric) is copper or incoloy, which is resistant to mild acids. Gas burners are below the tank and never contact the water. The only risk is if you let the vinegar sit for more than 24 hours — the acid can eventually weaken rubber seals and gaskets. Stick to the 3–6 hour soak window.
Do I need to flush the tank with fresh water after the vinegar soak?
Absolutely. Vinegar left in the tank will smell like a salad dressing and can cause off-tasting hot water. More importantly, residual acid can slowly degrade the tank lining over months. Flush with fresh water through the inlet until the outflow smells clean. It usually takes three or four fill-drain cycles.
Can I use this vinegar method on a tankless RV water heater?
Not the soak method. Tankless heaters use a heat exchanger coil, not a reservoir. You cannot fill it and let it sit. Instead, you need a recirculation pump and a bucket. Mix a 1:1 vinegar and water solution, pump it through the heat exchanger for 15 minutes, then flush thoroughly. Use a descaling kit designed for tankless units.
What to remember about cleaning your RV water heater with vinegar
- Vinegar dissolves scale, but only if it reaches the scale. Without air agitation, you’re wasting most of the acid.
- The Sediment Gone tool makes agitation simple — attach a hand pump and watch sediment exit through the clear window.
- Never skip the fresh water flush afterward. Residual vinegar ruins taste and can damage seals if left for weeks.
- Do not use vinegar on aluminum tanks. Use citric acid instead.
- Plan for a half-day project. The soak is long but the active work is short.
- If you hear rumbling or your water stays lukewarm, don’t ignore it. That’s a sign the sediment layer is robbing you of efficiency.
- A vinegar flush once a year adds years to your water heater’s life. It’s cheap insurance compared to a replacement.


