You walk into the shower expecting hot water. Instead you get cold, or worse, scalding hot that won’t stop. Your water heater is flashing an error code you’ve never seen. Nine times out of ten, a bad temperature sensor is the culprit.
This article walks you through what a temperature sensor does, how to tell if it’s failed, and exactly how to fix it. You’ll learn to test the sensor with a $10 multimeter, replace it yourself, and know when it’s smarter to call a plumber. No guesswork, no fluff.

Rheem
Rheem ProTech SP19299 Water Heater Thermistor Sensor
- Temperature sensor for heat pumps
- OEM genuine factory authorized part
If your water heater is a Rheem heat pump model, one reliable replacement part is the genuine Rheem Protech Thermistor AP19299 — an OEM factory-authorized sensor that matches your unit’s specs exactly. Using the correct part avoids mismatched resistance values that can confuse the control board.
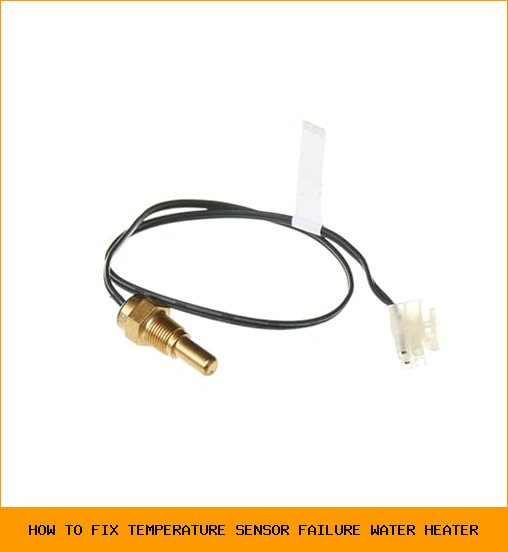
What a Water Heater Temperature Sensor Does (and When It Breaks)
A temperature sensor in a water heater is a thermistor — a resistor that changes its electrical resistance with temperature. Usually it’s a negative temperature coefficient (NTC) type: resistance drops as temp goes up. At 77°F (25°C), a common sensor reads about 10,000 ohms. At 120°F, that drops to roughly 2,500 ohms.
The control board reads that resistance to decide when to turn the heating element or heat pump on and off. If the sensor sends wrong data, the heater either won’t fire up at all, or it overheats.
Most failures happen because of:
- Aging and thermal cycling — after 5-8 years, the NTC element drifts or cracks open.
- Sediment buildup — mineral deposits insulate the sensor tip, making it read cooler than the actual water, so the heater runs too much.
- Loose or corroded wiring — a bad connection at the sensor plug gives erratic readings.
- Physical damage — the sensor can be knocked or bent during maintenance.
Common symptoms: the water is lukewarm when it should be hot, the heater cycles on and off rapidly, or you get an error code like E03, E04, or F01 (depends on brand). If you’re getting no hot water at all, the sensor might be dead open — infinite resistance — telling the board the water is already 150°F when it’s actually 60°F.
Diagnosing the Sensor: The Multimeter Test
Before you buy a new part, you need to confirm the sensor is actually bad. Grab a digital multimeter (even a $15 one works fine). Here’s the process.
- Turn off all power to the water heater. Flip the breaker. If it’s gas, turn the thermostat to pilot or off. Electric heaters store lethal voltage in capacitors. Don’t skip this.
- Locate the sensor. On most electric and heat pump water heaters, it’s mounted in the side wall of the tank, usually near the top or middle. It looks like a small brass or plastic probe with two wires coming out. Pull the wire connector off.
- Set your multimeter to resistance (ohms, Ω). Touch the probes to the two pins or terminals on the sensor. You’re looking for a reading. A working sensor at room temperature (around 70-80°F) should read between 8,000 and 12,000 ohms. If it reads 0 (short circuit) or OL (open line, infinite), the sensor is toast.
- Check the wire harness too. Sometimes the connector or wire itself is broken. Measure resistance at the control board end of the connector. If you get OL there but the sensor itself reads fine, the wiring is the problem.
- Use a temperature reference. If your reading is in range but you’re still suspicious, warm the sensor tip with your hand. Resistance should drop as it warms. If it stays flat, the sensor is sluggish and needs replacing.
One gotcha: some sensors use a different resistance curve. For a Rheem heat pump, the AP19299 thermistor is a 10k NTC at 77°F. If your brand uses a 50k or 100k sensor, the numbers will differ. Always look up your model’s spec sheet.
How to Replace a Failed Temperature Sensor
Once you’ve confirmed the sensor is bad, replacement is straightforward but requires care.
Tools needed: new sensor (OEM part recommended), Philips screwdriver (maybe), Teflon tape if the sensor threads into a well, bucket, towels.
- Drain the tank below the sensor’s level if it’s submerged. Most sensors sit above the heating elements, so you only need to drain a few gallons. Open the pressure relief valve or a hot water faucet to let air in.
- Remove the old sensor. If it’s a push-in type, just pull it out after removing a retaining clip. If threaded, use a wrench carefully. The sensor well can corrode — don’t snap it.
- Install the new one. Apply a small amount of heat sink compound or Teflon tape if the instructions say so. Push it firmly into the well or thread it in snug. Finger tight plus a quarter turn is enough.
- Reconnect the wiring. Match the wire colors. Most sensors are not polarity-sensitive, but the connector must click.
- Refill the tank before restoring power. Never energize a dry heating element. Open a hot water faucet until water flows steadily, then close it.
- Turn the breaker back on and set the temperature. The error code should clear. If it doesn’t, check that the connector is seated and the control board isn’t also fried.
Replacing a sensor on a Rheem heat pump water heater specifically? The Rheem Protech Thermistor AP19299 is a drop-in replacement. It’s the same part the factory uses, so you avoid any aftermarket quality issues. I’ve seen cheap generic sensors drift out of spec within six months — not worth saving ten bucks.
DIY vs. Hiring a Pro: What’s Worth It?
Most homeowners with basic electrical safety sense can swap a sensor in 30 minutes. But there are exceptions.
| Situation | DIY Feasible? | Approx. Time | Skill Level | Risk |
|---|---|---|---|---|
| Sensor access is easy (no tank draining needed) | Yes | 15-20 min | Beginner | Low |
| Sensor is in a tight recess or requires partial draining | Yes | 30-45 min | Intermediate | Low |
| Error code persists after replacement | Probably not | N/A | Expert | Moderate |
| You’re uncomfortable working near 240V or gas lines | No | 1-2 hrs (pro) | N/A | High |
| Heater is under warranty (less than 6-10 years old) | No — call pro to avoid voiding | Varies | N/A | High (warranty) |
The main trade-off: buying the right OEM part costs $15-40. A service call runs $150-300. If you’re handy, DIY saves real money. But if you’ve never used a multimeter or you’re dealing with a gas unit’s thermocouple and gas valve, pay the pro. A misdiagnosed sensor can lead to a flooded basement or a gas leak.
Frequently Asked Questions
Can a bad temperature sensor cause no hot water at all?
Yes. If the sensor fails open (infinite resistance), the control board thinks the water is already above 180°F and refuses to call for heat. You’ll get cold water no matter how long you wait. This is the most common failure mode.
Will a bad sensor always show an error code on the display?
Not always. Some control boards are dumb and just run the heater constantly or not at all without blinking an error. If your water is lukewarm or wildly fluctuating, test the sensor even if there’s no code.
How much does a replacement temperature sensor cost?
An OEM sensor like the Rheem Protech Thermistor AP19299 runs between $15 and $35. Generic ones can be as cheap as $8. I don’t recommend generics — the resistance curve might be off by 10-20%, which makes your heater run inefficiently. Check the current price on Amazon for your specific model.
Can I clean a temperature sensor instead of replacing it?
Sometimes. If the sensor is encrusted with mineral scale, you can soak it in white vinegar for 15 minutes and wipe it clean. Test resistance after cleaning. If it reads correctly, you’re good. But if the internal NTC element has drifted (reading 15k when it should be 10k), cleaning won’t fix it. Replace it.
Is a temperature sensor failure covered under my water heater warranty?
Most tank warranties (6, 10, or 12 years) cover parts including the sensor. Labor is usually not covered unless you have a labor rider. Check your paperwork. If under warranty, call the manufacturer and ask them to ship you a free replacement — don’t buy a part you might get for zero.
6 Things to Walk Away With
- Test the sensor with a multimeter. Room-temperature resistance should be roughly 8k-12k ohms for a common 10k NTC. Open (OL) or short (0) means failed.
- Turn off power and drain water only to the sensor level before touching anything. Safety first, always.
- Use an OEM replacement part like the Rheem Protech Thermistor AP19299 for Rheem heat pump models. Aftermarket parts often drift.
- If you clean a sensor and the reading doesn’t match spec, replace it. Cleaning only fixes physical scale, not internal drift.
- If the error code stays after replacement, suspect the control board or wiring harness — not the sensor.
- Don’t hesitate to call a licensed plumber if you’re unsure about electrical safety or if your unit is under warranty. A $300 service call beats a fried board or a voided warranty.


