You walk past your water heater and notice the little status light is dead. No blinking. No steady glow. Just nothing. For most AO Smith owners, that light is the only way to know the pilot is burning, so when it goes dark, it’s natural to assume the whole unit is broken. Sometimes it is. More often, it’s a single cheap part acting up.
This guide walks through the actual failure points in order of likelihood, how to test each one safely, and exactly what it costs to fix. You’ll learn which problems you can solve in ten minutes and which ones require a replacement part or a service call.

XDDPRO
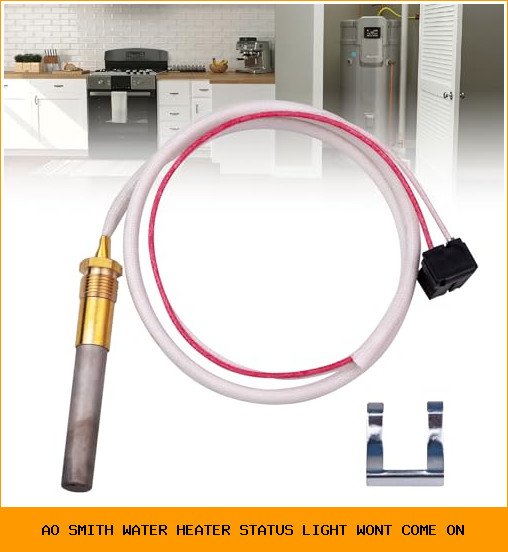
750mv Thermopile Senor Assembly Replace SP20824, SP20754, SP21058, SP20800 | SP21096, SP20739 Fit for Rheem Ruud Richmond Water Heaters Pilot Burner Gas Water Heater Thermocouple Sensor Type
- THERMOPILE SENOR ASSEMBLY: Thermopile water heater replacement parts are made of high-quality thermoelectric materials and metal a…
- RELIABLE PERFORMANCE: Thermopile senor parts, as a key component of the flame safety protection equipment of gas equipment, monito…
- COMPATIBLE MODELS: Thermopile gas water heater fit for rheem ruud and richmond water heaters pilot burner. Water heater thermopile…
Before you call a plumber, there are three things you should check yourself. The thermopile, the gas valve, and the pilot assembly. Each one has a distinct set of symptoms, and you can narrow down the culprit without any special tools beyond a multimeter.
One of the most common fixes involves replacing the thermopile. If yours is failing, a direct replacement like the XDDPRO 750mv Thermopile Sensor Assembly fits many Rheem, Ruud, and Richmond models and restores the voltage needed to keep the gas valve open. We’ll get into how to test yours before buying anything.
Why the Status Light Matters More Than You Think
The status light on an AO Smith water heater isn’t decorative. It’s tied directly to the thermopile, a small cylindrical device that sits in the pilot flame and generates electricity from heat. That electricity powers the gas valve. No light usually means no voltage, and no voltage means the gas valve won’t stay open.
Think of the thermopile like a tiny generator. The pilot flame heats it, and it produces a small DC voltage, typically around 750 millivolts when everything is working right. That voltage energizes an electromagnet inside the gas valve. If the voltage drops below about 350 millivolts, the magnet loses its grip and the valve closes. That’s a safety feature, but it’s also the reason your hot water disappears.
So when the status light won’t come on, you’re not just missing a light. You’re missing the signal that tells the gas valve to stay open. The fix almost always comes down to restoring that voltage.
The Three Real Causes (And How to Test Each)
1. The Thermopile Is Weak or Dead
This is the number one reason an AO Smith status light stays off. Thermopiles degrade over time. The metal alloy inside them corrodes from constant exposure to heat and combustion gases. A unit that produced 750 millivolts when new might only produce 200 after a few years.
Testing takes about five minutes. You’ll need a multimeter set to DC millivolts. Disconnect the two wires from the gas valve, attach the meter leads to the thermopile terminals, and light the pilot. Hold the pilot button down for about a minute to let the thermopile heat up, then read the voltage.
A healthy thermopile reads between 650 and 850 millivolts. If you’re seeing anything under 400, it’s time to replace it. The pilot flame itself might look fine, but the thermopile simply can’t generate enough power anymore.
One thing to note: a dirty pilot orifice can cause a weak, yellow flame that doesn’t heat the thermopile properly. Before you replace anything, clean the pilot tube and orifice with compressed air or a needle. That fixes a surprising number of cases.
2. The Gas Valve Has Failed Internally
If your thermopile tests fine at 750 millivolts but the status light still won’t come on, the problem is likely the gas valve itself. The electromagnet inside the valve can wear out or the internal coil can short. This is less common than thermopile failure, but it does happen, especially on units over ten years old.
You can do one more test to confirm. With the thermopile still connected and the pilot lit, measure voltage at the gas valve terminals. If you’re getting a solid reading there but the valve won’t stay open, the valve is the problem. Replacing a gas valve is more involved. It requires shutting off the gas supply and usually costs between $150 and $300 for the part alone. In many cases, if the water heater is that old, replacing the whole unit makes more financial sense.
3. A Loose or Corroded Wire Connection
This one gets overlooked constantly. The wires running from the thermopile to the gas valve are thin and exposed to humidity. Over time, the connections can corrode, or a wire can work itself loose from vibration. The result is an intermittent status light or one that won’t come on at all.
Before you buy any parts, disconnect the wires, inspect the terminals, and clean them with fine sandpaper or a wire brush. Reconnect them firmly. Sometimes that’s the entire fix. It costs nothing and takes five minutes.
Also check the ground wire. A poor ground connection can cause voltage readings that look fine on a bench but fail under load. Make sure the ground strap from the gas valve to the tank is clean and tight.
Comparing Your Repair Options
| Problem | Symptom | DIY Difficulty | Typical Cost | Time to Fix |
|---|---|---|---|---|
| Weak thermopile | Status light off, pilot stays lit only while holding button | Easy | $20–$40 for part | 30–45 minutes |
| Dirty pilot orifice | Small yellow flame, thermopile reads low voltage | Easy | $0 (cleaning only) | 15 minutes |
| Loose or corroded wires | Intermittent light, works after tapping the valve | Easy | $0 | 10 minutes |
| Failed gas valve | Thermopile reads 750mv but valve won’t stay open | Hard | $150–$300 for part | 1–2 hours |
| Bad control board (electronic models) | No light, no response to temperature dial | Hard | $100–$250 | 1 hour |
Notice that the two most common causes are cheap and easy to fix. Only the gas valve and control board failures require real effort. If you’ve got basic hand tools and a multimeter, you can handle the first three rows on your own.
Step-by-Step: Replacing the Thermopile
If your tests point to a weak thermopile, here’s the replacement process. It’s straightforward, but you need to be careful with the gas fittings.
- Turn the gas control valve to the OFF position. Wait five minutes for any residual gas to dissipate.
- Remove the outer access panel and the inner metal shield to expose the burner assembly.
- Disconnect the two thermopile wires from the gas valve. They’re usually held on with small screws or push-on connectors.
- Loosen the compression nut that holds the thermopile into the gas valve. You’ll need a small wrench, usually 7/16 inch or 1/2 inch.
- Pull the thermopile out from the top. It slides out through the access opening.
- Insert the new thermopile through the same path. Make sure the tip sits directly in the pilot flame path.
- Tighten the compression nut hand-tight, then give it a quarter turn with the wrench. Don’t overtighten.
- Reconnect the wires to the gas valve terminals.
- Turn the gas valve to PILOT, press the red button, and light the pilot. Hold the button for 60 seconds, then release.
- Turn the valve to ON and set your temperature. The status light should come on within a few seconds.
That’s the whole job. The hardest part is getting the new thermopile threaded through the access panel without bending it. Take your time and it’s a clean install.
If you’re replacing it, the XDDPRO thermopile assembly is built to handle the heat and humidity inside a water heater cabinet. It’s a direct fit for many Rheem, Ruud, and Richmond models, and the 750mv output is right in line with what your AO Smith needs. Just double-check your model number and the connector style before ordering.
When to Stop Troubleshooting and Call a Pro
There’s a limit to what you should do yourself. If you’ve tested the thermopile, cleaned the pilot, and verified the wiring, but the status light still won’t come on, you’re looking at a gas valve or control board issue. Both involve working with live gas lines and potentially dangerous components.
A licensed plumber or HVAC tech can diagnose the exact failure with specialized test equipment. The service call will cost you somewhere between $100 and $200, but it beats guessing and buying parts that don’t fix the problem. Also, if your water heater is still under warranty, attempting a gas valve replacement yourself could void it.
One more scenario worth mentioning: if the water heater is over 12 years old and the gas valve has failed, don’t sink money into it. A new gas valve plus labor is often half the cost of a new water heater. At that point, replacement is the smarter move.
Five Questions People Actually Ask
Why is my AO Smith status light blinking but the pilot is lit?
A blinking light usually means the thermopile is producing marginal voltage, somewhere between 400 and 600 millivolts. It’s enough to keep the pilot lit but not enough to reliably hold the main gas valve open. This is a classic symptom of a thermopile on its last legs. Test it with a multimeter and replace it if it reads below 650 millivolts.
Can a dirty pilot flame cause the status light to stay off?
Yes. A yellow or lazy flame doesn’t wrap around the thermopile properly, so it doesn’t generate enough heat. The flame should be a crisp blue cone with a small inner flame. If it’s yellow, clean the pilot orifice with a needle or compressed air. This is a free fix that resolves a lot of no-light issues.
How long does a thermopile last in a water heater?
Typically five to eight years, but it varies with gas quality and how often the unit runs. Hard water areas and high humidity tend to shorten the lifespan. If you’re replacing yours, it’s worth buying a quality part like the XDDPRO assembly rather than the cheapest option, because you’ll likely go another five years before touching it again.
Will the status light come on if the pilot won’t stay lit?
No. The status light only shows the thermopile is generating voltage, and that only happens when the pilot flame is heating it. If the pilot won’t stay lit, the thermopile cools down and voltage drops to zero. Fix the pilot issue first, then check the light.
Is it safe to use the water heater if the status light is off?
No, and here’s why. The status light off means the gas valve is likely closed or failing to stay open. If the valve is leaking or the pilot is out, you could be accumulating gas. If you smell gas at any point, shut off the supply valve and call a professional immediately. Don’t try to relight the pilot until you’ve confirmed there’s no gas smell.
What You Should Take Away From All This
- Test the thermopile with a multimeter before buying anything. A reading under 400 millivolts means replacement.
- Clean the pilot orifice first. A weak yellow flame is often the root cause of low voltage.
- Check and clean all wire connections. Corrosion and loose terminals cause intermittent issues that mimic part failures.
- Replace the thermopile with a quality 750mv unit like the XDDPRO assembly if your tests confirm it’s weak.
- Call a professional if the thermopile tests fine but the valve won’t stay open. That points to a gas valve failure.
- Don’t replace a gas valve on a water heater over 12 years old. The cost isn’t worth it.
- Smell gas? Shut off the supply and call for help. Don’t troubleshoot that on your own.
The status light is your water heater’s way of talking to you. When it goes dark, it’s not random. It’s telling you the safety system has engaged. Work through the checks in order, and you’ll either fix it in an afternoon or know exactly when to call in a pro.


