You step into the shower, turn the handle, and wait. The water warms up, but it never gets properly hot. Or worse, you get scalded because the tap runs at a temperature that feels like it came from a kettle. Most people don’t think about their water heater thermostat until something goes wrong. By then, you’re fiddling with a dial in a dusty closet, guessing at numbers.
This article cuts through the guesswork. You’ll learn the exact temperature range that balances safety, energy bills, and having enough hot water for a household. We’ll cover the science behind the settings, the risks of going too high or too low, and the step-by-step process for adjusting your unit. You will walk away knowing precisely what to set and why.
Before we dig into the numbers, a quick note on hardware. If your electric water heater runs too hot or not hot enough, the problem is often the upper thermostat. The Rheem UV11698 Therm-O-Disc Upper Thermostat is a common replacement part. It handles 208, 240, 277, and 480-volt systems and goes up to 150 degrees. Keeping a spare on hand makes sense if you’re comfortable with basic electrical work.
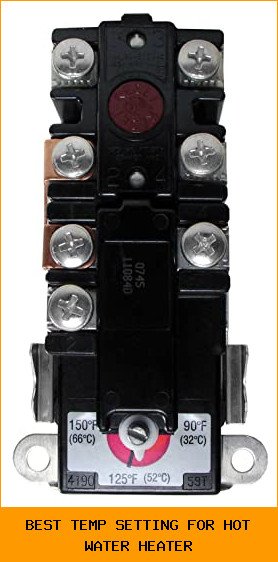
The 120°F Default: Why It’s the Standard
Most manufacturers ship water heaters set to 120°F (49°C). That’s not an accident. The US Department of Energy recommends this temperature because it slows mineral buildup and corrosion inside the tank. It also cuts standby heat loss, which is the energy wasted keeping water hot when nobody uses it.
For a typical family, 120°F is enough. A shower mixes that hot water with cold to get a comfortable 105°F. A dishwasher with a built-in heater can boost its own water temperature to sanitize dishes. You don’t need your tank hotter just for that.
There is a catch. If you have a large household or take long showers back-to-back, 120°F can run out fast. A 40-gallon tank at 120°F delivers less usable hot water than the same tank at 140°F. If you’re constantly running out, raising the temperature is a cheaper fix than buying a bigger tank.
Here’s the trade-off you need to understand: every 10°F increase adds roughly 3-5% to your water heating costs. That doesn’t sound like much, but over a year, it adds up. For a family of four, heating water accounts for about 18% of the utility bill. Small changes matter.
The 140°F Argument: Legionella and High Demand
Health experts and plumbers sometimes recommend 140°F (60°C). The reason is Legionella, the bacteria that causes Legionnaires’ disease. Legionella thrives in warm water between 77°F and 108°F. At 120°F, it survives but doesn’t multiply quickly. At 140°F, it dies within a few minutes.
If you have a compromised immune system, someone elderly in the home, or a baby, the higher setting adds a layer of protection. The World Health Organization suggests keeping stored hot water at 140°F to kill bacteria, then using mixing valves at the tap to bring it down to safe bathing temperatures.
That last part is critical. You should never let 140°F water come out of a faucet directly. It takes about five seconds to cause a third-degree burn at that temperature. Children and older adults have thinner skin and burn faster. A thermostatic mixing valve at the water heater outlet solves this. It blends the hot water with cold before it reaches your pipes, giving you 120°F at the tap while the tank stays at 140°F.
Most homes don’t need this complexity. If you’re healthy, have no high-risk individuals, and your water heater is in good shape, 120°F is the safe, sensible choice. Bump it up only if you have a specific reason.
Step-by-Step: How to Adjust Your Water Heater Temperature
Adjusting the thermostat is straightforward, but the process depends on whether you have an electric or gas unit. Here’s how to do it safely.
For Electric Water Heaters
- Turn off the power. Go to your breaker panel and flip the circuit labeled for the water heater. Do not skip this. Water and electricity are a deadly combination.
- Remove the access panels. You’ll see two panels on the side of the tank, one near the top and one near the bottom. Remove the screws and pull them off.
- Pull back the insulation. There’s fiberglass insulation behind the panels. Peel it back gently to expose the thermostat dial. Some units have a plastic cover over the dial; lift it off.
- Read the current setting. The dial has a pointer or a notch. Compare it to the marks on the thermostat body. Many dials just say ‘Low’, ‘Hot’, and ‘A’ (for 120°F). A flathead screwdriver turns the dial.
- Set the temperature. Turn the dial to your target. If you want 120°F, set the pointer to the ‘A’ mark or to 120 on models with numbers.
- Check the upper thermostat. The upper thermostat is the primary control. The lower one is secondary. Set both to the same temperature, or the tank will heat unevenly.
- Replace the insulation and panels. Tuck the insulation back in, snap the plastic covers on, and screw the panels back into place.
- Restore power. Flip the breaker back on and wait about an hour. Check the hot water temperature at a faucet with a cooking thermometer.
Pro tip: If your electric heater has two thermostats, the upper one is the boss. The lower one only kicks in when the upper section is satisfied. If the upper is set lower than the lower, you’ll get lukewarm water. Set them identically.
For Gas Water Heaters
Gas units have a single thermostat dial near the bottom of the tank, where the gas valve and burner are. The process is simpler.
- Turn the dial to ‘Off’ and wait a few minutes for the pilot light area to cool.
- Remove the dial cover if there is one. Some models have a small access door.
- Adjust the temperature dial. The markings are usually ‘Low’, ‘Hot’, ‘A’, ‘B’, and ‘C’. ‘A’ is 120°F, ‘B’ is 130°F, ‘C’ is 140°F.
- Relight the pilot if needed. Most modern units have a piezo igniter button. Hold the knob to ‘Pilot’, press the igniter, and then turn to ‘On’. If you have an older model, you’ll need a long lighter.
- Wait and verify. Give it 45 minutes to an hour, then test the water temperature at a sink.
If your gas heater keeps going out or struggles to reach temperature after adjustment, the thermocouple is likely failing. That’s a separate fix.
Comparing Temperature Settings: What Works Best for You
Here’s a quick reference table to help you decide. It weighs the pros and cons of each common setting based on household needs.
| Temperature | Best For | Pros | Cons | Energy Impact |
|---|---|---|---|---|
| 120°F (49°C) | Most single-family homes, small households | Safe at the tap, minimal burn risk, slower mineral buildup | Can run out of hot water during heavy use | Lowest operating cost |
| 130°F (54°C) | Families with moderate demand, dishwashers without boosters | Good balance of capacity and safety | Still a scalding risk for children, slightly higher bills | Moderate increase |
| 140°F (60°C) | High demand homes, immunocompromised individuals, commercial use | Kills Legionella, larger effective hot water capacity | Severe burn risk without mixing valve, faster tank corrosion | Noticeably higher bills |
| 150°F+ (65°C+) | Commercial kitchens, sanitizing needs | Excellent for killing bacteria | Extremely dangerous, requires professional mixing valves | Highest cost |
Notice the pattern. The right setting depends on your specific situation. A single person in an apartment needs 120°F. A family of six with a small tank might need 140°F plus a mixing valve. There’s no universal answer, but 120°F is the right starting point for almost everyone.
One thing to watch: if you set your tank above 130°F, you must install anti-scald devices on your showerheads and faucets. These are cheap and easy to install, but people forget them. A burn injury is not worth saving a few dollars a month.
Common Mistakes and How to Avoid Them
Over the years, I’ve seen the same errors repeated in homes. Here are the three biggest ones and the simple fixes.
Mistake 1: Setting the thermostat too high ‘just in case’. People crank it to 150°F thinking they’ll get hotter showers faster. The result is a higher bill and a real risk of scalding. You don’t need the tank at 150°F for a good shower. Set it to 120°F and adjust from there based on comfort.
Mistake 2: Forgetting the upper thermostat on electric units. If you adjust only the lower dial, the upper section still controls the overall heat. You’ll get a tank that’s hot at the top and cold at the bottom. Always set both to the same temperature.
Mistake 3: Testing the temperature wrong. You run the hot tap for two seconds and stick your hand under it. That’s not a real test. Let the water run for a full three minutes to get the tank temperature, then use a thermometer. The first burst of water is what’s sitting in the pipes, not what’s in the tank.
Five Questions People Actually Ask
Is 120°F hot enough to kill bacteria?
No. 120°F slows bacterial growth but doesn’t kill most pathogens, including Legionella. If you’re worried about bacteria, you need 140°F. The trade-off is safety at the tap. The standard solution is to keep the tank at 140°F and install a mixing valve so the water reaching your faucets is 120°F.
Will a lower temperature save me a lot of money?
Yes, but the savings are modest. Dropping from 140°F to 120°F can save a family of four roughly $25 to $40 per year. That’s not nothing, but it’s also not a game-changer. The bigger savings come from insulating your tank and pipes and fixing leaky faucets.
Why does my water heater run out of hot water faster after I lowered the temp?
Because you reduced the stored energy in the tank. Hot water at 140°F mixes with more cold water to reach a comfortable shower temperature. At 120°F, you use less cold water per shower, so you deplete the tank faster. If this is a problem, you have two options: raise the temperature slightly or install a larger tank.
Can I set my water heater to 130°F as a compromise?
Absolutely. 130°F is a reasonable middle ground. It gives you a bit more capacity than 120°F and a bit more safety than 140°F. Just be aware that at 130°F, a child can still get a second-degree burn in about 30 seconds. Use common sense and consider anti-scald devices on bathroom fixtures.
How often should I check my water heater temperature?
Once a year is plenty. Do it at the same time you flush the tank to remove sediment. Sediment buildup at the bottom actually insulates the water from the burner, making the heater work harder. A yearly check of the thermostat and a good flush will extend the life of your unit significantly.
Your Next Steps: Set It and Forget It (Mostly)
You now have the knowledge to set your water heater correctly. Here’s what to do today:
- Set your thermostat to 120°F if you haven’t already. It’s the safe, efficient default.
- If you have an electric unit, verify both the upper and lower thermostats match.
- Test the actual water temperature at a tap after the tank heats up. Trust the thermometer, not your hand.
- If you raise the temperature above 130°F, install mixing valves at the shower and sinks.
- Flush your tank once a year to remove sediment and keep the thermostat accurate.
- Consider replacing a faulty thermostat with a quality part like the Rheem UV11698 if you see inconsistent temperatures.
- Mark a calendar reminder for next year. A five-minute check now prevents a cold shower or a high bill later.
Getting the temperature right is a small task with real consequences. Set it once, verify it works, and you won’t think about it again until something breaks. That’s the goal.


