You walk into your basement after the second shower of the morning and see a puddle under the old tank water heater. Or maybe you’re tired of running out of hot water when the dishwasher and washing machine are both running. A tankless water heater sounds like the fix — endless hot water, smaller footprint, better efficiency. But you already have pipes, vents, and gas or electric service in place. Can you really just swap out the tank for a tankless unit without ripping everything open?
The short answer: yes, you can add a tankless water heater to an existing system — but the details matter a lot. This isn’t a simple swap like replacing a faucet. The gas line might be too small. The venting might be wrong. The electrical panel might need a new breaker and heavier wire. And even after installation, maintenance is completely different from a tank heater. I’ll walk you through exactly what to check, what to buy, and where most homeowners get tripped up.

6699
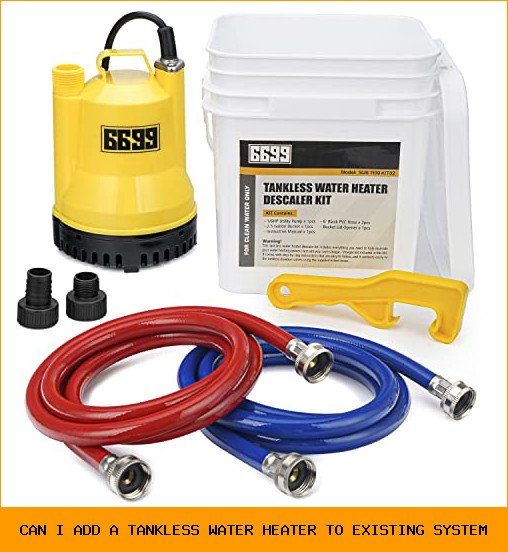
6699 Tankless Water Heater Flushing Kit, 1/6 HP Pump, 2 Hoses, 3 Gal Pail | Complete tankless water heater flushing kit with 1/6 HP pump, two 6 ft hoses, 3 gal pail, adapters, washers and lid opener.
- 【Tankless Heater Clean Kit】This cleaning kit comes with everything you need to maintain your water heating system. Helps maintain…
- 【Submersible Sump Pump】1/6HP energy-efficient motor with thermal overload protection, has the ability to deliver water to maximum…
- 【Easy to Use】This kit includes 3 gallons bucket with a bucket lid opener, 1/6HP utility pump with 2 adapters and 2pcs 6’ x 1/2” PV…
By the end of this article, you’ll know whether your home is a good candidate for a tankless retrofit, what modifications you probably need, and how to keep the unit running for years without breakdowns.
A few months into owning my own tankless unit, I learned the hard way that descaling isn’t optional. That’s when I picked up the 6699 Tankless Water Heater Flushing Kit. It comes with a 1/6 HP submersible sump pump, two 6-foot PVC hoses, adapters, and a 3-gallon bucket with a lid opener. Everything connects directly to your isolation valves. You mix one gallon of vinegar with one gallon of water, run the pump for 45 minutes, and flush out the mineral scale that kills tankless heaters. Without it, you’re looking at a $500 repair in a few years. Worth having on hand before you even install the unit.
What Your Existing System Needs to Handle a Tankless Heater
Before you buy anything, look at three things: fuel supply, venting, and water chemistry. A tankless heater demands way more energy in a short burst than a tank does. That means the gas pipe or electrical wires need to be sized for the new load.
Gas Pipe Sizing
Most tank water heaters use 1/2-inch or 3/4-inch black iron gas pipe. A typical 40-gallon tank pulls about 40,000 BTU/hour. A whole-house tankless unit — say, a 199,000 BTU model — needs at least 3/4-inch pipe, and often 1-inch, depending on the distance from the meter. If your existing line is 1/2-inch, you’ll need to run new pipe. That’s a job for a licensed plumber or gas fitter in most jurisdictions. Check your local code; some areas require a permit and pressure test.
Gas pressure also matters. Tankless units specify a minimum inlet gas pressure — usually 4 to 7 inches of water column for natural gas. If the pressure drops below that when the burner fires, the unit will throw an error code and shut down. A gas pressure test is cheap insurance.
Electrical Requirements
Electric tankless heaters draw massive current. A small point-of-use 120V unit might pull 30 amps, but a whole-house 240V electric tankless can pull 120–150 amps. That’s your entire electric service for most older homes. If your panel is a 100-amp service, upgrading to a large electric tankless likely means a panel upgrade and new wire runs. Gas tankless heaters still need electricity — usually 120V, 3–5 amps for the control board and ignition. That’s easy to supply from an existing outlet.
Here’s a quick comparison of what a typical retrofit requires for gas versus electric tankless:
| Requirement | Gas Tankless (whole-house) | Electric Tankless (whole-house) |
|---|---|---|
| Gas line size | 3/4-inch or 1-inch (upgrade likely) | Not applicable |
| Electrical service | 120V, 15A circuit (usually exists) | 240V, 60–150A (panel upgrade often needed) |
| Venting | Stainless steel or PVC (new vent run required) | No venting needed |
| Water flow rate (for 70°F rise) | ~4–6 GPM (depends on model) | ~3–5 GPM (depends on model) |
| Annual maintenance | Descaling with pump kit required | Descaling with pump kit required |
Notice that both types need the same descaling maintenance. That’s non-negotiable.
Venting: The Most Overlooked Problem
Gas tankless heaters use either direct vent (two pipes: one for intake, one for exhaust) or power vent (single pipe with a fan). Your old tank heater likely uses a natural-draft chimney or a power vent system designed for much lower exhaust temperatures. Tankless exhaust runs cooler — typically 120–150°F — and can condense inside a metal chimney, causing rust and carbon monoxide leakage. In almost every retrofit, you’ll need to run new stainless steel vent pipe (Category III or IV) or special PVC (for condensing units). This often means cutting through walls or ceilings.
Installation: What You Can Do Yourself vs. What Requires a Pro
If you’re handy with copper pipe and basic electrical, you can handle some parts. Mount the unit, connect cold and hot water lines, install isolation valves, and set up the condensation drain. But gas line modifications, gas pressure adjustments, and electric circuit upgrades should be left to licensed pros. I’ve seen too many DIY installs where the gas line was undersized and the unit short-cycled, or the vent pipe was the wrong material and leaked CO into the living space.
The water hookup is straightforward. Most tankless units come with 3/4-inch NPT connections. If your home has 1/2-inch copper, you’ll need to increase the pipe diameter near the unit to maintain flow. A common mistake is leaving 1/2-inch runs that choke the flow to 3 GPM when the unit can do 6. That defeats the purpose.
Flow Rate and Temperature Rise Math
Every tankless heater has a maximum flow rate at a given temperature rise. If your incoming groundwater is 45°F in winter and you want 120°F showers, that’s a 75°F rise. Check the manufacturer’s chart. A typical whole-house gas unit (199,000 BTU) might deliver 4.5 GPM at a 75°F rise. If you run two showers and a dishwasher, you’re over 4.5 GPM — and the water temperature drops. Size the unit for your peak simultaneous demand, not just the biggest fixture.
A lot of homeowners buy a unit rated for their summer groundwater temperature (maybe 60°F) and are shocked when winter water feels lukewarm. Don’t be that person. Calculate based on the coldest month’s groundwater temperature. Call your local water utility or ask a neighbor.
Maintenance That Keeps a Tankless Heater Alive
Here’s the part nobody tells you before you buy: tankless heaters scale up faster than tanks because the heat exchanger passages are narrow. Hard water (calcium and magnesium) builds up inside and reduces flow. The unit then overheats, shuts down, or develops pinhole leaks in the heat exchanger. Replacing a heat exchanger costs almost as much as a new unit.
Annual descaling is mandatory if you have water hardness above 5–7 grains per gallon. Even with soft water, every 2–3 years is wise. The 6699 flushing kit makes this a 45-minute job. Close the isolation valves, connect the hoses to the hot and cold service ports, drop the pump into the bucket with a vinegar-water mix, and let it recirculate. The pump has a 1/6 HP motor, pushes 1100 GPH at 16.5 feet of head — more than enough for this. The bucket lid opener is a nice touch; those 3-gallon pails can be stubborn.
If you skip descaling, you’ll see error codes like E0, E1, or 11 (overheat) within two years. I’ve replaced three heat exchangers for friends who thought the maintenance was a scam. Trust me, it’s real.
Other Maintenance Tasks
- Clean the inlet water filter every 3–6 months. A tiny piece of debris can block flow and cause the unit to cycle.
- Inspect the vent termination for obstructions like bird nests or leaves every spring.
- Listen for unusual sounds: a rumbling noise indicates scale buildup in the heat exchanger. Flush immediately.
Common Mistakes When Adding Tankless to an Existing System
- Undersizing the unit. People buy a unit that’s perfect for one shower but forget about simultaneous loads. You’re better off slightly oversized than undersized.
- Skipping a recirculation line. Tankless heaters have a delay — cold water in the pipes means you wait 30–60 seconds for hot water at the tap. A recirculation pump (either a dedicated return line or a cross-over valve under the sink) solves this. Without it, you waste water waiting.
- Ignoring condensate neutralization. Condensing tankless units produce acidic condensate. If you drain that into a cast iron or copper pipe, it’ll corrode. You need a neutralizer kit or drain into plastic pipe.
- Mounting it in an unheated space. The freeze protection in most units only works if the power stays on and the unit senses cold water. A power outage in a freezing garage can ruin the heat exchanger in one night. Install it indoors or in a conditioned space.
Frequently Asked Questions
Can I connect a tankless water heater to my existing copper pipes?
Yes, you can. Most tankless units have 3/4-inch NPT fittings that connect to copper using dielectric unions or brass adapters. If your existing pipes are 1/2-inch, it’s best to increase to 3/4-inch for at least the last few feet before the unit. Otherwise, you’ll reduce flow and may get temperature fluctuations.
Do I need a permit to add a tankless water heater?
In most areas, yes. Replacing a gas appliance or adding a new electrical circuit requires a permit from your local building department. Some jurisdictions also require a licensed plumber or gas fitter for gas line work. Check with your city or county before starting. Failing to get a permit can cause issues when you sell the house or file an insurance claim after a leak.
How long does a tankless water heater last compared to a tank?
A tankless unit typically lasts 20–25 years with proper maintenance. A tank water heater lasts 8–12 years. The key difference is that tankless heat exchangers can fail if you don’t descale, while tank heaters fail from rust. Both can be extended with care, but tankless has a longer potential lifespan if you stay on top of cleaning.
Will my water pressure drop after installing a tankless heater?
It shouldn’t, if the unit is sized correctly and your incoming pressure is adequate (40–80 PSI). Tankless heaters create some pressure drop through the heat exchanger — typically 3–10 PSI at rated flow. That’s similar to a tank heater. If you have low pressure (below 40 PSI), adding a tankless can make it worse. Check your static pressure with a gauge before buying.
Can I use the same gas line from my old tank heater?
Probably not. The old line is almost always too small. A tank heater needs 30–45,000 BTU/hr. A tankless needs 150–200,000 BTU/hr. The pipe diameter must increase to handle that volume without excessive pressure drop. Have a gas fitter calculate the required size based on the distance from the meter and the unit’s BTU input. Expect to run new pipe in most cases.
Things to Remember Before You Start
- Measure your groundwater temperature in winter, not summer. Size the unit for that number.
- Gas line almost always needs upgrading. Budget $500–$1500 for that work.
- Venting is a separate system. Do not reuse the old chimney or vent pipe.
- Electric whole-house tankless is impractical unless you have 200-amp service and are willing to upgrade more.
- Buy a descaling kit like the 6699 before you install the unit. You’ll need it within a year.
- Install a recirculation loop or cross-over valve if you don’t want to wait for hot water at far fixtures.
- Get a permit and hire a licensed pro for gas and electrical work. The upfront cost is worth avoiding a fire or CO leak.


