Creating the Perfect Sauna Environment
Saunas provide a unique experience of warmth and relaxation, but achieving the perfect atmosphere requires careful attention to ventilation. Many sauna enthusiasts overlook the crucial role of air intake vents, which can significantly impact the comfort and efficiency of your sauna. Without proper ventilation, your sauna can quickly become stuffy, making it less enjoyable to use.
Installing an intake vent behind a sauna electric heater not only helps in regulating temperature but also ensures a consistent supply of fresh air. In this article, you’ll learn the best practices for installing an intake vent, along with tips to enhance your sauna experience. You’ll walk away with a comprehensive understanding of the installation process and the benefits it brings.
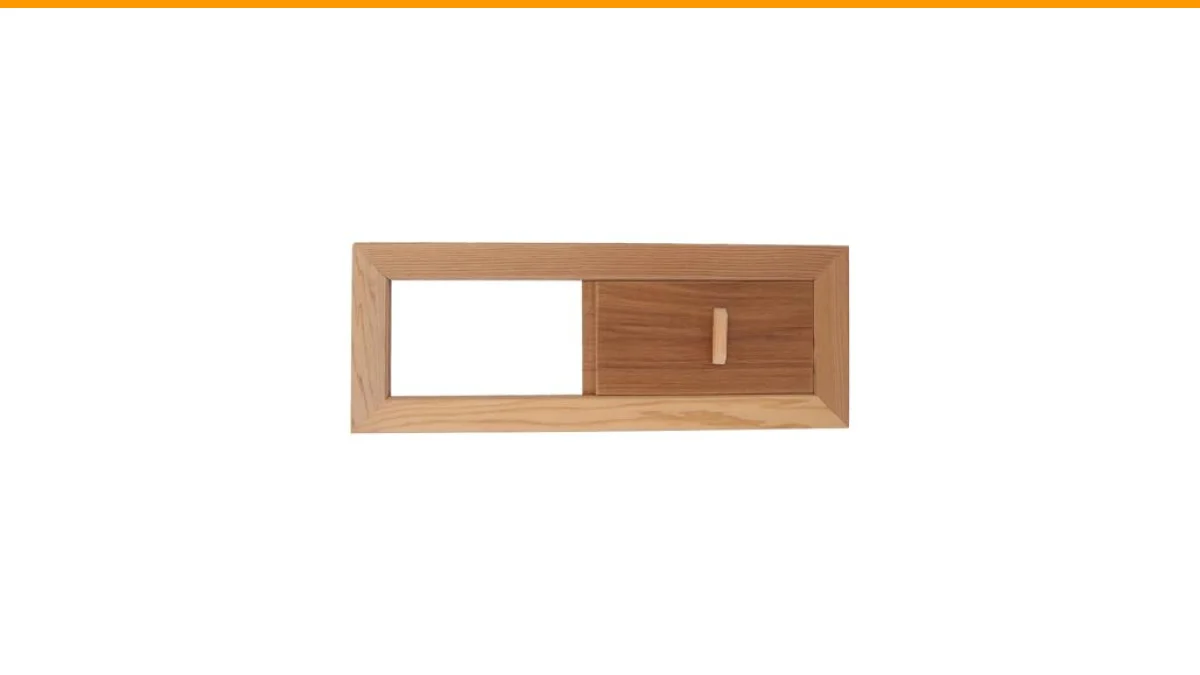
An excellent product to consider for your sauna ventilation needs is the Yulatik Premium Cedar Wood Sauna Air Vent. This adjustable sliding ventilation grille is crafted from high-grade cedar wood, making it perfect for the humid environment of a sauna. It allows for precise airflow control to help maintain an optimal balance of temperature and oxygen levels.
Understanding Sauna Ventilation
Many people believe that a sauna should be completely sealed to retain heat. This is a common misconception. While it’s essential to keep the heat in, a completely sealed environment can lead to stagnant air and humidity buildup. Proper ventilation allows fresh air to circulate, which is essential for both safety and comfort.
Here are a few key points about sauna ventilation:
- Fresh air intake helps prevent the buildup of carbon dioxide and other gases.
- Stagnant air can lead to a muggy sauna experience.
- Proper ventilation helps maintain the integrity of the sauna materials by reducing moisture accumulation.
Choosing the Right Location for Your Intake Vent
The location of your intake vent is critical for effective air circulation. Ideally, the vent should be positioned near the electric heater but not directly behind it. This placement helps to draw in cooler air from the room, which then gets heated before circulating through the sauna.
Consider the following factors when selecting a location:
- Height: The vent should be placed at a lower height since cooler air sinks. This allows for effective airflow as the heated air rises.
- Distance from Heater: Keep a distance of at least 12 to 18 inches from the heater to avoid any direct interference with the heating element.
- Accessibility: Ensure that the vent is easy to reach for adjustments and maintenance.
Steps to Install an Intake Vent
Installing an intake vent behind a sauna electric heater is a straightforward process. Here’s a step-by-step guide to help you:
- Gather Your Materials: You will need the Yulatik Premium Cedar Wood Sauna Air Vent, a measuring tape, a pencil, a level, construction adhesive or finishing nails, and a drill.
- Measure the Space: Use the measuring tape to find the appropriate location behind the heater. Mark the area where the vent will be installed.
- Cut the Opening: If necessary, use a saw to cut an opening in the wall or panel where the vent will be placed. Ensure the dimensions match those of the vent.
- Install the Vent: Secure the vent in place using construction adhesive or finishing nails. Make sure it’s level and flush with the wall, allowing for smooth airflow.
- Test the Vent: Once installed, test the vent by sliding it open and closed. Ensure it moves smoothly and adjusts the airflow as needed.
Common Misconceptions About Sauna Vents
Many sauna users have misconceptions about how ventilation works in a sauna. Addressing these can help improve your sauna experience:
Myth: More Vents Equal Better Ventilation
Some believe that adding multiple vents improves airflow. In reality, too many vents can disrupt the air circulation pattern. It’s better to have one well-placed vent than several poorly positioned ones.
Myth: A Sealed Sauna is More Efficient
As mentioned earlier, sealing a sauna completely is counterproductive. While it may seem efficient, it can trap humidity and lead to discomfort. Proper ventilation maintains a balance that enhances your sauna experience.
Comparing Ventilation Options
| Vent Type | Material | Adjustability | Best Use |
|---|---|---|---|
| Yulatik Cedar Vent | Cedar Wood | Adjustable | Saunas |
| Plastic Vent | Plastic | Fixed | General Use |
| Metal Vent | Metal | Adjustable | High-Heat Areas |
Frequently Asked Questions
How do I know if my sauna needs ventilation?
If you notice a buildup of humidity or a stale odor in your sauna, it likely needs ventilation. Proper airflow prevents these issues and provides a more enjoyable experience.
Can I install the vent myself?
Yes, installing an intake vent is a DIY-friendly project. With basic tools and the right materials, most homeowners can complete the installation successfully.
What size vent do I need for my sauna?
The size of the vent depends on the sauna’s dimensions. A typical vent size is around 13.4″ x 5.1″, which fits standard ventilation gaps.
How often should I adjust my intake vent?
Adjust the vent based on your sauna sessions. If you feel the air is too stale or too hot, adjust the vent to allow more fresh air in.
Is cedar wood better than other materials for sauna vents?
Cedar wood is naturally resistant to moisture and decay, making it an excellent choice for sauna environments. It also adds a pleasant aroma, enhancing the overall experience.
Final Thoughts on Sauna Vent Installation
- Proper ventilation is essential for a comfortable sauna experience.
- Position your intake vent close to the heater, but not directly behind it.
- Follow a systematic approach for installation to ensure effectiveness.
- Address common misconceptions to optimize your sauna usage.
- Consider quality materials like cedar for durability and functionality.
- Regularly adjust your vent to maintain the desired atmosphere.
- Enjoy the benefits of a well-ventilated sauna, including improved air quality and comfort.