You just replaced your water heater, fired it up, and walked outside to check the vent. A wisp of exhaust sneaks out from a joint. Or worse, you smell gas. That tiny leak can kill efficiency, cause backdrafting, or send carbon monoxide into your home. Sealing vent pipe connections is not optional. It’s a safety requirement.
In this article I’ll walk you through exactly how to seal water heater vent pipe for both atmospheric and power-vent systems. You’ll learn what materials to use, what to avoid, and how to tell if your work is actually sealed. I’ve inspected hundreds of vent installations over the years, and most problems come from one of three things: wrong sealant, improper overlap, or gaps at the roof penetration. We’ll cover all of them.

Blulu
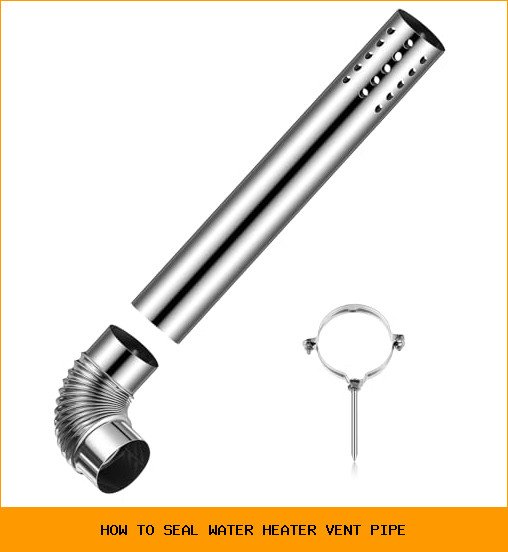
Blulu Stainless Steel Direct Vent Pipe Kit for Tankless Water Heater of 3" Od Elbow and 3" Od x 19.7 Length Horizontal Termination Pipe with Chimney Rain Cap and Clip for Water Heater and Ductwork
- Package Include: you will receive 1 x vent pipe and 1 x vent elbow; This tankless water heater vent pipe positions you to easily i…
- Precise Dimensions: the size of elbow vent is 3" OD elbow and 3" OD x 19.7" length, the is meticulously designed to fit within you…
- Reliable Material: the horizontal termination pipe is constructed from 201 stainless steel, known for its high temperature resista…
This guide covers gas water heaters — electric units don’t vent combustion gases. If you have a tankless or high-efficiency unit with a direct vent (PVC or stainless steel), the rules change. I’ll call out those differences as we go.
A product that makes this job a lot easier is the Blulu Stainless Steel Direct Vent Pipe Kit (ASIN: B0D8TPCCS3). It includes a 3-inch OD elbow, a 19.7-inch horizontal termination pipe, a rain cap, and clips. The kit is built from 201 stainless steel, so it handles high temperatures without rusting through. If you’re working on a tankless water heater or any 3-inch direct vent system, having all the pieces match from one kit saves you the headache of mixing brands that don’t seat right.
What You Need to Know Before You Start
First, understand what type of vent you have. Atmospheric vents — common on older tank-style water heaters — rely on natural draft. They use single-wall or double-wall (Type B) metal pipe. The joints are male-female crimped ends. You seal them with high-temperature silicone or, in some jurisdictions, nothing at all if the pipe has a locking tab.
Power-vent and direct-vent water heaters use a fan to push exhaust out. These systems operate under positive pressure. That means every joint must be absolutely airtight. Plastic PVC or CPVC pipe is common for lower-temperature condensing units, while stainless steel is needed for non-condensing high-efficiency models.
The universal rule: never use duct tape, standard silicone caulk, or any sealant not rated for continuous exposure to flue gas temperatures. Most flue gases run between 350°F and 550°F. Standard caulk melts, drips, and can burn off in an hour.
Step-by-Step: How to Seal Water Heater Vent Pipe for Atmospheric Systems
Atmospheric vents are the simplest to work with. The pipe sections are designed to slide together with a 1.5-inch overlap minimum. To seal them properly:
- Dry-fit every joint. Slide the male end into the female end. It should go in with moderate force. If it’s loose, the connection will never seal. If it’s too tight, you might need to deburr the male end with a file.
- Apply a thin bead of high-temperature silicone sealant. I use a product rated to at least 500°F (like Rutland RTV 500 or equivalent). Run a bead around the male end about ½ inch from the crimped edge. Then push the joint together fully. Do not wipe away the excess that squeezes out — that tells you the gap is filled.
- Secure the joint with 3 sheet-metal screws. Drill pilot holes if the metal is thick (Type B double-wall). Place screws 120 degrees apart, about ½ inch from the joint. This keeps the pipe from pulling apart under thermal expansion.
- Test for leaks. Light a match or incense stick. Hold it near each joint while the water heater is running. If smoke pulls into the joint, you have a leak. Sealant alone may not fix a gap bigger than 1/16 inch.
One hard lesson I learned early: don’t over-apply sealant. Too much gets squeezed inside the pipe, where it can catch debris and create turbulence. A thin, even ring is all you need.
When to Skip Sealant Altogether
Some building codes allow unsealed joints on Type B double-wall vents provided the pipe has a locking tab or twist-lock mechanism. These vents rely on the spiral locking system to create a mechanical seal. Adding silicone can actually prevent the lock from engaging fully. Check your local code. In my experience, a dab of silicone at the screw hole still helps.
How to Seal Power-Vent and Direct-Vent Systems (CPVC, PVC, and Stainless Steel)
These systems run under pressure. A pinhole leak can push exhaust into the house. The approach changes based on material.
PVC and CPVC Pipe
Primer and solvent cement are the only acceptable sealants for plastic vent pipe. Do not use silicone or caulk — it won’t bond and will fail under positive pressure. Here’s the process:
- Cut the pipe square with a saw or pipe cutter. Deburr the inside edge.
- Clean the inside of the fitting and the outside of the pipe with primer. Use a purple primer so inspectors can see it was applied.
- Apply a generous coat of solvent cement to both surfaces. Push the pipe into the fitting with a ¼-turn twist. Hold for 15 seconds.
- Wipe off the excess cement bead — this confirms a good bond.
Let the cement cure for the time specified on the can. For CPVC, that’s usually 15 minutes to handle, 24 hours before pressure testing. Never test with the water heater running; cap the pipe and use a smoke machine or soapy water under low pressure.
Stainless Steel Direct Vent (like the Blulu Kit)
Stainless steel direct vent pipes are typically designed with a gasket or a silicone O-ring at the joint. No additional sealant is required if the joints snap together completely. But I’ve run into kits where the gasket sits crooked or gets pinched during assembly. In those cases, a thin coat of high-temp silicone (rated above 400°F) on the male end before assembly can salvage a poor fit.
With the Blulu kit, the horizontal termination pipe has a crimped end that slides into the elbow. The included clips hold everything tight. I always add a bead of high-temp silicone at the joint inside the clip — cheap insurance. The 201 stainless steel resists corrosion from condensation better than galvanized pipe, which is a common failure point on cheaper vents.
Table: Comparison of Sealant Methods by Vent Type
The table below summarizes the sealing approach for the three most common water heater vent materials.
| Vent Type | Material | Recommended Sealant | Mechanical Fastener | Common Mistake |
|---|---|---|---|---|
| Atmospheric (Type B) | Galvanized steel | High-temp silicone (500°F+) | 3 sheet-metal screws per joint | Using standard silicone which melts |
| Power-vent (PVC) | PVC / CPVC | Solvent cement + primer | None (cement bond only) | Applying silicone over cement |
| Direct-vent (High-efficiency) | Stainless steel (201/304) | Factory gasket + optional high-temp silicone | Metal clips or band clamps | Over-tightening clips and cracking gasket |
| Direct-vent (Condensing) | Polypropylene | Twist-lock with O-ring (no sealant) | Locking tabs | Using primer/cement (burns pipe) |
Common Mistakes That Ruin a Good Seal
I’ve been on service calls where the homeowner used aluminum foil tape on the vent joints. It holds for a few heat cycles, then the adhesive fails and the tape peels off. The same goes for duct mastic — not rated for flue gas temps.
Another frequent error: not checking the vent slope. Atmospheric vents need a minimum ¼ inch per foot upward slope. Power vents can run horizontal, but they need a slight slope back toward the heater to drain condensation. If the slope is wrong, moisture pools at the joints, rusts metal, and destroys the seal over time.
People also forget to check the roof boot. If the boot around the vent pipe on the roof is cracked, rainwater runs down the pipe and into the joint. That water causes the silicone to separate. Always inspect the top-side penetration after you seal indoors.
One more: using too many screws. Three per joint is plenty. More than that can distort the pipe, especially on thin-walled stainless steel. I once saw a DIY job with eight screws on one joint — the pipe was oval by the time they finished, and it never sealed.
Frequently Asked Questions
Can I use regular silicone caulk to seal my water heater vent?
No. Standard silicone caulk is rated for temperatures around 200°F. Flue gases from a natural draft water heater can hit 400°F. The caulk bakes, cracks, and falls out. You need high-temperature silicone rated to at least 500°F. Look for brands like Rutland, Red Devil, or GE high-temp. Check the label — it should say ‘flue gas’ or ‘stove’ on the tube.
Do I need to seal both ends of the vent pipe?
Only the joints between sections need sealant. The bottom of the vent pipe connects to the water heater draft hood — that’s usually a friction fit with a tab. You don’t seal that unless the draft hood is damaged. The top termination (through the roof) shouldn’t be sealed solid; you need air to enter for draft. But the flashing boot needs a seal against rain.
How do I know if my vent pipe is leaking?
Best test: light a stick of incense. With the water heater running, hold the burning end near each joint. If smoke gets pulled into the joint, you have a leak. You can also use a handheld carbon monoxide detector — hold it near the vent while the burner is on. Any reading above 0 ppm means exhaust is escaping.
Is it safe to use pipe thread tape on vent connections?
Teflon tape (PTFE tape) is for threaded water or gas fittings, not for vent pipe joints. It melts at around 600°F, which is borderline for flue gases. More importantly, it doesn’t create a seal on the tapered overlap joints of vent pipe — it just gets pushed off when you slide the sections together. Don’t use it.
How often should I inspect and re-seal the vent pipe?
Once a year, ideally before heating season. Look for cracks in the sealant, rust around screws, or loose joints. If you see soot around any connection, that’s a leak path. Re-apply sealant as needed. The vent pipe itself may last 15–20 years, but the sealant degrades from thermal cycling. Budget to re-do it every 3–5 years on atmospheric vents.
Five Things to Remember
- Use high-temperature silicone rated above 500°F for metal vents — don’t cut corners with standard caulk.
- On plastic power vents, primer and solvent cement are the only correct sealants; never substitute silicone.
- Every joint needs both a sealant layer and mechanical fasteners (screws, clips, or lock tabs) to prevent separation.
- Test each joint with an incense stick while the burner is on — your nose is not reliable enough for carbon monoxide.
- Inspect the roof flashing and the draft hood connection annually; a leak outside will kill the seal inside.
Getting the seal right means your water heater runs efficiently, your family stays safe from CO, and you don’t need to pull the vent apart every winter. Take the extra ten minutes to do it carefully. Your lungs will thank you.


