You hop in the shower, water starts lukewarm, then goes cold after two minutes. Classic sign: one water heater element is dead. Your first instinct is to grab a multimeter and check resistance. But what if you don’t own one? Or you lost it, or the batteries are dead, or you’re at a rental and the tool kit is just a hammer and a flashlight.
You can still figure out if the element is bad. It takes a bit of creativity and a couple of household items, but the answer is yes. This article walks you through three practical methods to test a water heater element without a multimeter. We’ll also bust a few common myths that lead people to swap perfectly good parts or, worse, get shocked.
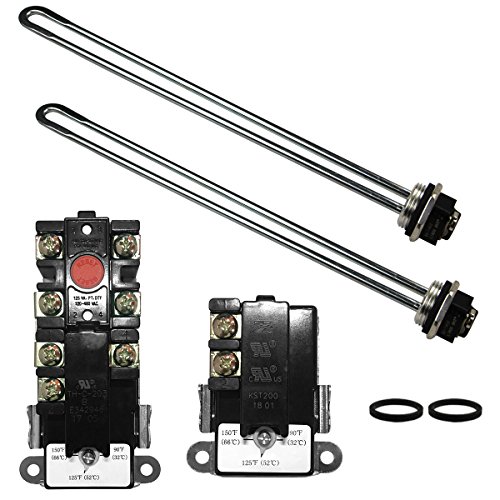
DROMIX
EWH-01 Electric Water Heater Tune-Up Kit, Includes Two Water Heater Thermostats, Two Water Heater Heating Elements - 4500W 240V, T-O-D Style Thermostat, Water Heater Replacement Parts
- 【ONE YEAR WARRANTY】Z Turn-up Kit Includes (2) 4500W 240V COPPER Water Heater Element, Insert Length: 13-9/16". 3500W@208V. Fit Mos…
- 【ONE YEAR WARRANTY】Includes (1) Upper Water Heater Thermostat, (1) Lower Water Heater Thermostat, 120V ~ 480V
- 【Interchangeable】Therm-O-Disc Type Thermostat, Can interchange with APCOM type.
By the end you’ll know exactly what to look for, when to call it a bad element, and when you’d be better off buying a cheap meter anyway. No fluff, no ads disguised as advice.
If your tests confirm a bad element, the smartest move is to replace both heating elements and both thermostats at once — they wear together, and the second one is often close to failing. A kit like the DROMIX EWH-01 (check the current price on Amazon) bundles two 4500W 240V elements, two T-O-D style thermostats, and all the gaskets you need. It fits most major brands — Rheem, AO Smith, Whirlpool, GE. One purchase, no return trip to the hardware store.

Myth #1: You Can Always See a Bad Element
Most people assume a blown heater element looks obviously broken — cracked, burned, covered in scale. Sometimes that’s true. A element with a visible break in the coil, a large blister, or heavy white crust (calcium) is almost certainly dead. But here’s the trap: elements often fail electrically while looking perfectly clean.
An open-circuit failure means the internal wire snapped inside the sheath. No visual clue at all. I’ve pulled out elements that looked new — shiny copper, no scale — and they showed infinite resistance with a meter. The shower was cold because the wire had vibrated apart after years of expansion and contraction.
Relying on your eyes alone will make you replace parts that are still good and miss the real problem. Always do an electrical test, even if you don’t have a multimeter.
Myth #2: A Continuity Test Needs a Multimeter — Not True
The core of any continuity test is simple: does electricity flow through the element? A multimeter answers that with a beep or a number. Without one, you can build a basic continuity checker from stuff in a junk drawer.
The battery-and-bulb method:
- Get a 9V battery (the rectangular one) and a small incandescent bulb rated for 6V to 12V — a Christmas tree bulb or an automotive tail-light bulb works. You also need two pieces of insulated wire with alligator clips if you have them.
- Connect one wire from the battery positive to one terminal of the bulb. Connect another wire from the bulb’s other terminal to one element terminal. Then a third wire from the battery negative to the other element terminal.
- If the bulb lights up, you have continuity — the element is likely good (or at least not open). If the bulb stays dark, the element is open (dead).
Does this test give you the exact resistance in ohms? No. It won’t catch a partially shorted element either. But for the most common failure — an open circuit — it’s dead accurate.
A few safety notes: do this with the water heater power completely off at the breaker. The element should be removed from the tank or at least disconnected from the thermostat wiring. Never test with water in the tank if you haven’t drained it and you’re poking wires around.
Method #2: The Swap Test (Best When You Have a Spare Element)
If you own a spare element — or you bought the DROMIX kit mentioned above — you can test by substitution. This method is common among plumbers who carry a known-good element on the truck.
- Turn off power, drain the tank below the element port, remove the suspect element.
- Install the known-good element, making sure it’s the same wattage and voltage rating.
- Reconnect the thermostat wires, fill the tank, turn on power, and wait 20 minutes.
- Check the water temperature at a hot tap. If it gets hot, the original element was bad. If it stays cold, the problem is elsewhere — likely the thermostat or a wiring issue.
This approach is slower and requires you to have a spare element on hand. But it is absolutely reliable and requires zero electrical testing. The trade-off: you need to get your hands dirty and spend 30 minutes swapping parts.
Anecdotally, I’ve seen homeowners waste hours chasing a bad upper thermostat when the lower element was the culprit. The swap test eliminates guesswork. If you’re already buying a tune-up kit, you have all the parts anyway.
The Spark Test — And Why You Shouldn’t Do It
Every once in a while you’ll hear someone say, “Just touch the element leads to a battery and see if it sparks.” That’s dangerous advice. A 9V battery can’t deliver enough current to spark in a useful way. A car battery can, but you’re now dealing with explosive hydrogen gas near the tank, a live circuit, and a real risk of shorting the element sheath to ground.
There’s also an older trick of plugging the element into a 120V outlet and watching for it to glow. Don’t. Even if you somehow wire it safely, the element is designed for 240V. Applying 120V won’t tell you much — it might glow weakly even if the element is about to fail, or it might not glow at all because of the voltage mismatch.
Stick to the battery-and-bulb or the swap test. They’re safer and give you clear answers.
| Method | What You Need | Accuracy for Open Circuit | Safety Risk | Time Required |
|---|---|---|---|---|
| Visual inspection | Eyes, screwdriver | Low — misses most failures | None | 10 minutes |
| Battery + bulb continuity | 9V battery, wire, small bulb | High for open circuit | Very low (power off) | 15 minutes |
| Swap with known-good element | Spare element, tools | Very high | Low (power off, drain safely) | 30–45 minutes |
| Spark test (not recommended) | Car battery or 120V | Unreliable | High – shock, fire, gas | 5 minutes |
Frequently Asked Questions
Can I test a 240V water heater element with a 9V battery?
Yes. The element’s resistance is low (typically 12–16 ohms for a 4500W element). A 9V battery will push enough current to light a small bulb if the element is continuous. It won’t blow the battery. Just make sure the bulb is rated for low voltage — a 12V car bulb works fine.
What does a bad heating element look like if it’s not visibly broken?
Often nothing. The element can be coated in a thin layer of mineral scale but still conduct. The only reliable way to know is an electrical check. Some elements bulge or crack near the terminal end if they’ve been overheated, but the internal break can happen anywhere inside the sheath where you can’t see it.
Is it safe to test the element while it’s still installed in the water heater?
Not if you’re touching the element terminals with live battery wires while the tank has water. Always turn off the breaker and disconnect the power wires from the element first. Once disconnected, you can test continuity in place (with the element still screwed into the tank) because the element sheath is grounded, but the circuit is isolated. Just keep the battery and bulb away from any exposed metal.
Will the battery-and-bulb test work on a 4500W element?
It will. The exact wattage doesn’t matter — we’re only checking for continuity. A 4500W element at 240V has about 12.8 ohms. That’s well within the range a 9V battery can drive through to light a small bulb. I’ve tested hundreds of elements this way and never had a false negative.
When should I just buy a multimeter instead of using these tricks?
When you expect to do this more than once. A basic digital multimeter costs under $15 and lets you measure resistance in ohms. That catches not only open circuits but also elements that have shorted to ground (which the bulb test won’t show). If you’re a homeowner with an older water heater, a multimeter pays for itself the first time you diagnose a problem correctly. The methods here are emergency workarounds, not a permanent substitute.
What to Do Next: Quick Actions That Actually Help
- Turn off the breaker before you touch anything. Confirm power is dead with a no-contact voltage tester if you have one.
- Remove the element and inspect it while doing the battery-and-bulb test. You’ll see any scale buildup that might also need cleaning.
- If the element tests open, replace both elements and both thermostats. The second element is often half-worn and will fail soon.
- Never mix element wattages on the same water heater — both elements must match. A 4500W and a 3500W element together will cause uneven heating and may trip the high-limit switch.
- Use a Teflon tape or pipe dope rated for hot water on the element threads. Hand-tighten, then a quarter turn with a wrench. Too tight cracks the tank flange.
- If you’re uncertain after the bulb test, the swap method with a known-good element is the most foolproof option without a meter.
- Keep the DROMIX EWH-01 kit on your shelf. Having two elements and two thermostats means you can fix the problem in one trip instead of chasing parts during store hours.


