First real cold snap hits, you hop in the shower, and the water goes lukewarm after six minutes. Or worse — you find a puddle creeping out from under the tank the morning after a freeze. That’s the moment most homeowners start wondering how to winterize a hot water heater. The good news: you don’t need a plumber. You just need to know five specific actions, the right order to do them, and the few tools required.
This article walks you through what actually matters for winterizing — not the generic “drain it once a year” advice you’ve heard a thousand times. I’ll explain why each step works, what the numbers say, and where most people screw up. By the end, you’ll know exactly what to do for your specific setup, whether it’s gas, electric, or in a seasonal cabin that sits empty from November to April.
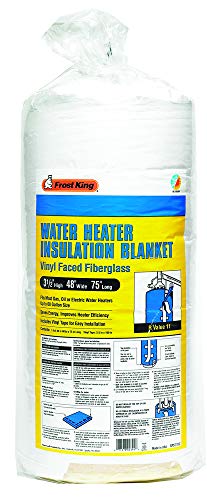
Frost King
Frost King SP57/11C All Season Water Heater Insulation Blanket, 3” Thick x 48” x 75”, R10
- Vinyl backed fiberglass insulation blankets are designed for gas, oil or electric water heaters up to 60 gallon size
- Improves heater efficiency
- 3” thick x 48” x 75”, R10
One tool that makes the job easier from the start is a good insulation blanket. The Frost King SP57/11C All Season Water Heater Insulation Blanket (3 inches thick, R10 value) cuts standby heat loss by up to 45% in an unheated basement or garage. It fits tanks up to 60 gallons, works on gas, oil, or electric units, and comes with the tape you need to secure it. Slap it on before the temperature drops, and your heater won’t have to cycle as often to keep the water hot. Check the current price on Amazon if you want one.
Why Winterizing Matters More Than You Think
Most people think winterizing means just wrapping the pipes. That helps, but the heater itself is where the biggest losses and biggest risks live. A standard 50-gallon electric water heater loses about 10% of its stored heat every hour through the tank walls when the surrounding air is 60°F. Drop that ambient temperature to 40°F (common in unheated basements or garages), and standby loss jumps to roughly 18% per hour. Your heater runs more, your bill goes up, and the tank works harder than it should.
Freezing damage is the other worry. If the room around the heater drops below 32°F for more than three hours, water in the bottom of the tank can freeze. Ice expands, cracks the inner glass lining, and that’s a new water heater. I’ve seen this happen in a weekend cabin where the owner thought setting the thermostat to 50°F was enough — it wasn’t. The heater sat in an uninsulated corner, the pipes froze first, and the tank split along the bottom seam.
Winterizing isn’t complicated, but it is specific. Skip one step and you can still wind up with a flooded utility room.
Insulating Your Tank the Right Way
First step: wrap the tank. The Frost King blanket I mentioned earlier is R10 insulation — that’s about equivalent to a standard wall in a modern home. You cut the blanket to size, wrap it around the tank, and tape the seams. Simple, but a few rules matter.
Gas water heaters need the top left uncovered. The combustion air intake and draft diverter need room to breathe. Covering them starves the flame of oxygen and creates a carbon monoxide risk. Electric tanks have no such restriction — you can wrap the whole thing, including the top.
Keep the blanket away from the burner access panel. On a gas unit, leave the bottom six inches clear so the burner gets air. On electric, just don’t block the thermostat access covers in case you need to adjust settings later.
The numbers: a 3-inch blanket with R10 reduces standby heat loss by about 25% in a 50°F basement, and closer to 40% in a 30°F garage. That’s not a guess — it’s based on the R-value math. The payback period is usually one winter if you keep the heater in a cold space. In a conditioned basement, it’s more like two or three winters. Still worth it.
Draining Sediment and Preventing Freeze Damage
Sediment builds up at the bottom of the tank over time — calcium carbonate mostly. A quarter-inch of sediment cuts heat transfer from the heating elements (or gas burner) into the water by about 25%. That means you burn more energy to get the same hot water. In winter, when the incoming water is colder, the heater works even harder.
Drain the tank at least once before winter. Here’s the process:
- Turn off power to the heater (breaker for electric, gas valve to pilot mode for gas).
- Attach a garden hose to the drain valve at the bottom.
- Run the hose to a floor drain or outside. If it goes outside, disconnect and store the hose after — frozen hose = no drain next time.
- Open the drain valve and let the water flow. Open a hot water faucet upstairs to let air into the system.
- Let it run until the water runs clear. Sometimes that takes 10 minutes, sometimes 30. Don’t cut it short.
- Close the drain valve, remove the hose, turn the water supply back on, and then restore power.
If you’re winterizing a cabin that will sit empty, do a full drain: shut off the water supply, open all hot and cold faucets, disconnect the heater’s drain hose, and let gravity empty everything. Then pour a cup of food-grade antifreeze (propylene glycol, not automotive) into each drain trap and the heater drain valve to keep the remaining water from freezing. Leave the valves open so nothing traps water.
Temperature Settings and Anode Rod Check
Most factory thermostats ship set at 140°F. That’s too hot for daily use and wastes energy. In winter, the sweet spot is 120°F to 125°F. At that range, you kill bacteria (legionella dies above 115°F) without burning extra power. Every 10°F drop in setpoint saves you 3% to 5% on water heating costs. Going from 140°F down to 120°F saves you 6% to 10% — real money in a cold month.
While you’re at it, check the anode rod. This is the sacrificial metal rod that prevents your tank from rusting. It’s usually on top of the tank, under a plastic cap. Look for a hex head. Use a 1-1/16” socket wrench to loosen it. If the rod is less than 1/2 inch thick or covered in gunk, replace it. A good anode rod costs about 25 bucks and extends tank life by years. I replace mine every three winters regardless of how it looks.
| Winterizing Method | What It Does | Best For | Cost | Difficulty |
|---|---|---|---|---|
| Insulation blanket | Reduces standby heat loss by up to 40% in cold spaces | Unheated basements, garages, crawlspaces | $20–$40 | Easy |
| Drain sediment | Improves efficiency 15–25% and prevents freeze cracks | All heaters, especially in hard-water areas | Free | Moderate |
| Adjust thermostat to 120°F | Saves 6–10% on heating costs vs. factory 140°F | Any occupied home | Free | Easy |
| Replace anode rod | Prevents internal rust, extends tank life 3–5 years | Heaters over 3 years old | $25–$50 | Moderate |
| Insulate exposed pipes | Prevents freezing in supply lines and valves | Unheated areas near the heater | $10–$30 | Easy |
Frequently Asked Questions About Winterizing Water Heaters
Should I turn off my water heater in the winter if I leave for a week?
No. Turning it off completely lets the water cool down, and when you return, the heater has to work hard to bring 50 gallons of cold water back up to temperature. Instead, lower the thermostat to “vacation mode” (about 90°F on some models) or simply set the temperature dial to the lowest setting that still keeps pipes above freezing. For a gas heater, turn the dial to “pilot” — that keeps the pilot light burning without heating the tank.
How often should I drain my water heater before winter?
Once per year is enough for most households. If you have hard water (calcium deposits visible on faucets), drain it every six months. An easy rule: drain it in October before the heating season starts. That way you start winter with a clean tank.
Can I use a space heater to keep my water heater from freezing?
Not directly. Space heaters placed too close to a water heater create a fire risk, especially near gas units with pilot lights. If the room is below 32°F, insulate the heater and pipes first. Only as a last resort, use a thermostatically controlled electric heater set to 40°F in the room — but keep it at least three feet from the water heater and never leave it unattended.
What temperature should I set my water heater to in winter?
120°F to 125°F. That’s hot enough for showers and washing dishes, kills bacteria, and saves energy. Going above 130°F increases the risk of scalding and adds unnecessary cost. If your heater has a vacation mode, use it when you’re away.
Do I need a water heater blanket if my heater is already in a heated basement?
Not necessarily. If your basement stays above 60°F year-round, the energy savings from an insulation blanket are small — maybe 5% versus 25% in a cold garage. The blanket still helps if the heater is against an exterior wall that gets cold in winter. But for a fully conditioned space, skip the blanket and focus on draining sediment and checking the anode rod.
Final Tips for a Winter-Ready Water Heater
- Wrap the tank with an R10 blanket if it sits in an unheated space — it pays for itself in one cold season.
- Drain sediment every October. Set a calendar reminder. A clean tank uses less power and won’t crack when water freezes at the bottom.
- Drop the thermostat to 120°F. Mark the dial with a sharpie so you know where it’s set. Check it again after the first cold snap.
- Replace the anode rod every three winters. A $25 rod can add five years to the heater’s life.
- Insulate the first 3 feet of hot and cold pipes leaving the tank with foam pipe sleeves. Frozen pipes near the heater are the most common failure point in a mild freeze.
- If you own a seasonal cabin, do a full drain and pour propylene glycol antifreeze into every trap and valve. Leave all faucets open so no water stands inside.
- Check the pressure relief valve (T&P valve) by lifting the test lever once a year. If no water comes out, or it drips after you release it, replace the valve before winter.


