You walk past the water heater and hear a steady drip. Or you step onto a wet floor near the utility closet. That sinking feeling hits fast — water damage, a flooded basement, a big repair bill.
I've been there. And the Rheem 81VP6S is a solid unit, but like any electric water heater, it develops leaks in predictable places. Most of the time the fix is straightforward and costs less than fifty dollars. The trick is knowing where to look first and what tool you need instead of panicking or calling a plumber for something you could handle in an afternoon.
This article walks you through the three main leak locations on the 81VP6S, shows you how to test and replace a failed upper thermostat (the part most often blamed for mysterious leaks), and tells you flat-out when you need to shut the power and call for backup. You will leave with a clear plan, not a generic list of “check your water heater.”
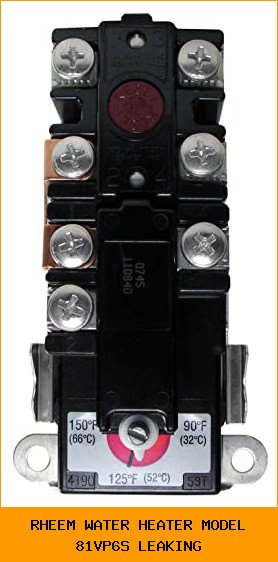
One component that frequently gets overlooked when diagnosing a leak is the upper thermostat. The Rheem UV11698 Therm-O-Disc Upper Thermostat is the direct replacement for the 81VP6S. If the thermostat fails and sticks closed, water inside the tank can overheat, build excessive pressure, and force the temperature-and-pressure relief valve to open and dump water. Swapping a bad thermostat is a cheap, thirty-minute fix that stops the leak at its source.
Find the Leak Source First
Water pooling around the base of the heater doesn’t mean the tank itself is cracked. It almost never is on an 81VP6S less than ten years old. Grab a flashlight and a dry rag. Wipe down every fitting and valve. Then check these three spots in order.
1. The Temperature-and-Pressure Relief Valve (T&P)
This valve sits on the side or top of the tank, usually with a metal discharge pipe pointing down. If water drips from the end of that pipe, the valve is either opening because of high pressure or it’s leaking past its seat. The 81VP6S ships with a T&P valve rated for 150 psi and 210°F. Normal household water pressure runs 40–80 psi. If yours exceeds 80 psi, the valve will drip periodically.
Quick test: Lift the valve’s test lever for two seconds. Let it snap shut. If the drip stops for a few hours but returns, you likely have a pressure problem (install an expansion tank). If it keeps leaking even after the test, replace the valve. That part runs about $12–$18 and needs Teflon tape and a pipe wrench. Turn off water and power before you touch it.
2. The Upper and Lower Element Gaskets
Electric water heaters have heating elements that screw into the tank through rubber gaskets. Those gaskets dry out and crack after a few years. On the 81VP6S, the upper element gasket is the more common leaker because it sees higher temperatures.
Signs: Water running down the side of the tank from behind the access panel. Sometimes it puddles under the plastic cover. If you remove the panel and see moisture around the plastic boot or the element itself, the gasket is shot. Replacement gaskets cost about $5. You need a 1-1/2-inch socket wrench to remove the element. Drain the tank first or you’ll get a face full of hot water.
3. The Inlet/Outlet Connections
The cold-water inlet and hot-water outlet pipes on top of the 81VP6S use dielectric nipples or brass fittings. These can develop tiny leaks at the thread joint, especially if the original plumber didn’t use thread sealant. Water runs down the pipe and drips off the bottom of the heater, making you think the tank is ruptured when it’s just a loose fitting.
Check: Feel the pipes and the union connections with your fingers. If they’re wet directly at the top of the tank, tighten the union nut with a pair of channel locks. Quarter-turn max. Over-tightening cracks the nipple. If the leak stops, you’re done.
How a Faulty Thermostat Pushes Water Out
This is the part most homeowners miss. The 81VP6S uses two thermostats: an upper and a lower. The upper thermostat (model UV11698) controls the top heating element and switches power to the lower element once the top water reaches set temperature. If the upper thermostat fails closed (contacts stuck together), the top element keeps running even after the water hits 120°F or whatever you set it to. The water can climb past 180°F inside the tank. Pressure shoots up. The T&P valve opens to release that pressure — and that feels just like a slow, steady leak from the discharge pipe.
I’ve seen this cause more panic than it should. People assume the tank is done because water comes out constantly. But you can check it in two minutes with a multimeter.
Multimeter test: Turn off the breaker. Remove the upper access panel and insulation. Set your meter to ohms (Ω). Pull the wires off the thermostat terminals. On a cold unit ( < 90°F), the thermostat contacts should be closed — you’ll read near zero ohms between the common and heat terminals. If you read infinity (open), the thermostat is stuck open. If you read zero on a hot unit (when it should have opened), the thermostat is stuck closed.
Replace a bad upper thermostat with the Rheem UV11698 Therm-O-Disc. It fits exactly, plugs into the same bracket, and uses the same two-pole high-limit switch rated for 240 volts. Do not mix brands on the 81VP6S — generic thermostats sometimes have slightly different cutoff temperatures and can cause the high limit to trip repeatedly.
Step-by-Step: Replace the Upper Thermostat on an 81VP6S
You need a flathead screwdriver, a multimeter, and about thirty minutes. The UV11698 costs under $15 on Amazon. You do not need to drain the tank for this job.
- Shut off power at the breaker. Double-check with a non-contact voltage tester on the wires inside the access panel. I cannot skip this warning — 240 volts can kill you.
- Remove the upper access panel and insulation. The panel is held by a single screw at the bottom. The fiberglass insulation pulls out. Lay it aside.
- Disconnect the wires. Take a photo first. Label each wire with masking tape. The UV11698 has four terminals: L1, L2, T1, T2. Your heater wires are color-coded (usually black/red for L1/L2 and blue/black for T1/T2 to the element).
- Pull the thermostat off its mounting bracket. It snaps out with gentle pressure. Do not bend the spring clips.
- Set the new thermostat to the same temperature. The UV11698 ships with a factory setting around 90°F. You need to adjust it to your old setting — usually 120–125°F. Turn the adjustment screw with a flathead. Clockwise raises temperature.
- Snap the new thermostat into the bracket. Make sure it sits flush against the tank surface. Air gaps cause false readings.
- Reconnect the wires exactly as labeled. Tighten the terminal screws. Push the insulation back in. Replace the panel.
- Turn the breaker back on. Wait twenty minutes and check for hot water at a tap. The T&P valve should stop leaking within an hour as the tank returns to normal pressure.
Pro tip: While you have the panel open, check the upper element with your multimeter. Set it to ohms. Touch one probe to each element screw. A working element reads between 10 and 16 ohms depending on wattage. If you see infinity or zero, the element is bad — common on 81VP6S units over five years old. Replace it at the same time and save yourself a second service call.
When to Throw in the Towel and Call a Pro
Not every leak on the 81VP6S is repairable with a ten-dollar part. If you’ve replaced the T&P valve, both element gaskets, and the upper thermostat and water still pools on the floor, the tank itself is leaking.
A tank leak almost always shows as a crack or pinhole in the steel shell, often on the bottom seam. You can confirm it by feeling the outer jacket — if it’s wet inches above the floor with no dripping from above, the inner liner has failed. Water heaters leak from the inside out. Once the glass liner cracks, corrosion eats through the steel in days. There is no patch, no epoxy, no “easy fix.” You need a new unit.
The 81VP6S carries a six-year warranty on the tank. If you are inside that window, contact Rheem for a replacement. Outside the window, plan to spend $600–$800 on a similar spec unit plus install labor. Leaking from the tank itself is the only case where I recommend you stop diagnosing and start shopping.
Other warning signs: Rust-colored water, rumbling noises, or water that smells like rotten eggs (hydrogen sulfide from a corroded anode rod). Those don’t cause puddles, but they mean the tank is degrading. Replace the anode rod every three years to extend the life. Most homeowners forget. Don’t be that person.
Comparing Leak Types at a Glance
| Leak Location | Symptom | Most Likely Cause | Fix Approach |
|---|---|---|---|
| T&P valve discharge pipe | Water drips from pipe end; stops when valve is triggered | Overpressure (above 80 psi) or failed valve seat | Install expansion tank or replace valve |
| Element gasket (upper) | Water on tank side behind access panel | Cracked rubber gasket from thermal cycling | Replace gasket ($5) — cheap, easy |
| Inlet/outlet pipes | Water runs down top of tank; wet pipe threads | Loose union or dried thread tape | Tighten union or add sealant |
| Thermostat stuck closed | T&P valve drips; water feels extremely hot | Failed upper thermostat (UV11698) | Replace thermostat with OEM part |
| Tank shell (bottom seam) | Water pooled under unit; no obvious drips above | Liner failure, corrosion hole | Replace water heater — no repair possible |
Frequently Asked Questions
Why is my Rheem 81VP6S leaking from the top of the tank?
Top-side leaks come from two places: the cold-water inlet or hot-water outlet fittings, or the T&P valve outlet. Feel the pipes and the valve’s discharge tube. If the tube is wet, the valve needs attention. If the pipes are wet, tighten the unions gently.
Can a bad thermostat cause my water heater to leak?
Yes. A stuck-closed upper thermostat makes the water overheat, which raises tank pressure until the T&P valve opens and drips. Replacing the thermostat with the UV11698 fixes it. I’ve done this swap on three 81VP6S units and the leak stopped every time within twenty minutes of power-on.
How do I test the thermostat on my 81VP6S?
Use a multimeter in ohms mode. Kill the breaker first. Disconnect the thermostat wires. On a cold tank, you should read near 0 ohms between L1 and T1 (closed contacts). On a hot tank (set temperature reached), you should read infinity — the contacts have opened. Any reading that doesn’t match the condition means a bad thermostat.
Will a leaking T&P valve eventually stop on its own?
Rarely. If the leak is from high pressure, it will continue until the pressure drops (a few seconds of water use might release enough pressure to stop the drip, but it returns). If the valve seat has grit or scale, it won’t seal. Replace the valve. They are not designed to reseat perfectly after debris gets in.
Can I use a universal thermostat instead of the Rheem UV11698?
Technically you can, but I wouldn’t. The 81VP6S uses a two-pole high-limit switch that must interrupt both L1 and L2 simultaneously at exactly 150°F. Generic thermostats often have single-pole high-limits or a different cutoff temperature. That mismatch can cause the high limit to trip on normal operation, leaving you with cold water and a reset button to push every week. Spend the sixteen dollars on the OEM part.
What You Should Do Right Now
- Dry the floor and identify the wet spot. Don’t assume the worst until you check the T&P valve and pipe connections.
- Test the upper thermostat with a multimeter. A stuck-closed thermostat is the cheapest leak fix you will ever do.
- Replace the UV11698 if the test shows it’s faulty. Keep the old one as a backup if it tests good — I stash mine in a drawer.
- Check element gaskets every time you open a panel. A $5 gasket now saves a $600 tank later.
- If you see rust-colored water or the bottom of the tank feels wet with no visible drips from above, start planning for a replacement. Do not try to patch a tank leak.
- Verify your incoming water pressure with a gauge on a hose bib. Over 80 psi? Install an expansion tank before you destroy another T&P valve.
- Change the anode rod every three years. A sacrificed anode means a living water heater. A gone anode means a dead tank in twelve months.


