You woke up to a cold shower. The solar water heater that worked flawlessly all summer just stopped cooperating. The control panel flashes an error code you have never seen. Your first thought is the electric bill, your second is the repair cost.
Most solar thermal systems fail not because of the panels or the tank, but because of neglect. Scale builds up in the collector loop, antifreeze degrades, and small leaks go unnoticed for months. The good news is that regular maintenance prevents almost all of these failures. This article covers the practical steps you can take today to keep your system running efficiently for another decade.

6699
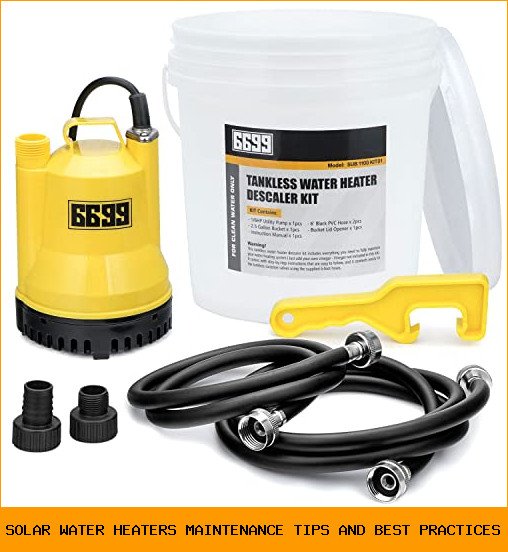
6699 Tankless Water Heater Descaling Flush Kit Includes Submersible Utility Pump with Adapters 3 Gallons Pail with Bucket Lid Opener and Two 3/4" GHT X 6FT PVC Black Hoses Easy Installation to Clean
- Tankless Heater Flush Kit- This cleaning kit comes with everything you need to maintain your water heating system. Helps maintain…
- Submersible Sump Pump- 1/6HP energy-efficient PSC motor with thermal overload protection, has the ability to deliver water to maxi…
- Easy to Use- This kit includes 3 Gallon Bucket with a bucket lid opener, 1/6HP utility pump with 2 adapters and 2 black 6 feet PVC…
You will learn how to flush the loop, inspect the key components, handle freeze protection, and avoid the three mistakes that kill more solar water heaters than anything else.
Before you start, consider what you need on hand. A submersible pump and a bucket with hoses make the descaling process far easier than trying to drain the loop with gravity. The 6699 Tankless Water Heater Descaling Flush Kit includes a 1/6 HP pump, two 6-foot PVC hoses, and a 3-gallon bucket with a lid opener. It connects directly to your isolation valves, so you can circulate a cleaning solution without a plumber. The pump moves 1100 gallons per hour, which is plenty for a solar loop. It is not made for a specific brand, so it works with most systems.
Why Solar Loops Need Regular Flushing
The fluid inside your solar collector loop does more than transfer heat. It also carries minerals, sediment, and byproducts from the breakdown of the antifreeze itself. Over time, these particles settle in the lower sections of the piping and inside the heat exchanger. That layer of gunk acts like insulation, blocking heat transfer from the collector to your water tank.
A 1/8-inch layer of scale can cut heat transfer efficiency by up to 20 percent. You will notice it as longer recovery times after heavy use, or a system that runs all day without reaching the set temperature. The fix is a simple flush with a mild acid solution.
What You Need for a Flush
- Distilled white vinegar (one gallon per three gallons of water) or a commercial descaling solution made for solar thermal systems.
- A submersible pump rated for at least 500 GPH.
- Two hoses long enough to reach from the pump to the isolation valves.
- A bucket large enough to hold the fluid volume of your loop plus the cleaning solution.
Do not use tap water for the final rinse. Tap water introduces new minerals that will re-form scale. Use distilled or deionized water for the last pass.
Step-by-Step Flushing Procedure
Turn off the pump and let the system cool down for at least two hours before you touch anything. Hot fluid under pressure can cause serious burns. Close the isolation valves on both the supply and return lines. This traps the fluid in the collector loop so you can work on the pump side safely.
- Attach one hose to the drain port on the supply side and run it into the bucket.
- Attach the second hose to the fill port on the return side and connect it to the pump outlet.
- Fill the bucket with your cleaning solution. For a 3-gallon bucket, mix one gallon of vinegar with two gallons of water.
- Open the isolation valves and turn on the pump. Let the solution circulate for 45 minutes to an hour.
- Watch the fluid color. If it turns dark brown or black, drain it and refill with fresh solution. Run again until the fluid stays clear.
- Drain the cleaning solution and rinse with distilled water for 10 minutes.
- Close the isolation valves, disconnect the hoses, and refill the loop with fresh heat transfer fluid if needed.
- Schedule a visual inspection for the first weekend of every month. Ten minutes with a flashlight catches most issues early.
- Test the pressure relief valve annually. Replace it if it does not release cleanly.
- Flush the loop every two years, or every 18 months if you have hard water.
- Check glycol concentration before winter. Replace the fluid every three to five years.
- Wash the collector glass twice a year with mild soap and a soft brush.
- Keep a spare pressure relief valve and a set of o-rings on hand. They cost little and save a service call.
- Write the date of your last flush on the side of the tank with a permanent marker. You will not remember otherwise.
Pro tip: mark the hoses with tape so you do not mix up supply and return next time. It does not damage the system if you reverse them, but it makes the flush less effective.
The whole process takes about two hours the first time you do it. Once you have done it twice, you will get it down to 90 minutes.
Inspecting the Components That Actually Fail
Flushing handles the fluid, but the hardware needs attention too. Here is what to check during each maintenance session.
Pressure Relief Valve
This small valve sits on the side of the tank or near the collector outlet. It releases pressure if the system overheats. Lift the lever manually once a year. If water or steam does not come out, the valve is stuck and needs replacement. If it drips constantly after you close it, the seat is worn. Replace it. A stuck valve is the most common cause of a burst tank.
Expansion Tank
The expansion tank absorbs pressure changes as the fluid heats and cools. Tap it with your knuckle. It should sound hollow on the top half and solid on the bottom. If it sounds full all the way up, the internal bladder has ruptured. Replace the tank. This is a 30-minute job that prevents pressure spikes that damage the collector.
Pump and Controller
The pump should run smoothly without grinding or rattling. Listen for cavitation, which sounds like gravel inside the pump housing. That usually means air is trapped in the loop. Bleed the air at the highest point of the system. The controller display should not show error codes. If it does, check the sensor readings against the actual temperature at the collector with a separate thermometer.
Collector Glass and Seals
Cracked glass lets moisture inside the collector box, which ruins the insulation and corrodes the absorber plate. Inspect the glass after heavy hail or wind storms. Check the rubber seals around the frame for cracks or gaps. Re-seal with high-temp silicone rated for outdoor use.
Freeze Protection and Antifreeze Checks
If your system uses a glycol antifreeze mixture, the concentration matters. Glycol degrades over time and becomes acidic. That acidity corrodes the metal fittings and the heat exchanger. Test the fluid with a refractometer or antifreeze test strips. The mixture should protect down to the coldest temperature your area sees, usually around -30°F for northern climates.
Replace the entire fluid charge every three to five years, depending on the manufacturer’s recommendation for your specific glycol type. Propylene glycol is safer for the environment but breaks down faster than ethylene glycol. If you see a sludgy brown residue in the fluid, the glycol has oxidized. Drain and replace it before it eats through the pump seals.
For drain-back systems, where the fluid drains into a reservoir when the pump stops, freeze protection is less critical. But you still need to verify the sensors are positioned correctly so the system drains completely. A sensor mounted too high leaves water in the collector, which freezes and cracks the pipes.
Comparing Maintenance Approaches
| Method | Frequency | Time Required | Tools Needed | Skill Level |
|---|---|---|---|---|
| Visual inspection | Monthly | 15 minutes | Flashlight, ladder | Beginner |
| Pressure relief valve test | Yearly | 5 minutes | None | Beginner |
| Glycol concentration test | Yearly | 10 minutes | Refractometer | Intermediate |
| Full loop flush with pump | Every 2-3 years | 2 hours | Flush kit, cleaning solution | Intermediate |
| Professional service call | Every 5 years | Half day | Specialized tools | Professional |
The flush kit mentioned earlier covers the tools for the most demanding task on the list. The other items require little more than a wrench and a few minutes of your time.
Common Questions About Solar Water Heater Maintenance
How often should I flush my solar water heater loop?
Every two to three years is the general rule for closed-loop systems with glycol. If your water is hard, meaning it has high mineral content, move that to every 18 months. You will see the benefit in the form of steady hot water output. Systems that never get flushed lose efficiency gradually, so you may not notice the decline until the water goes cold.
Can I use vinegar to descale my solar water heater?
Yes. White vinegar with 5 percent acetic acid works fine for removing scale. It is slower than commercial descaling agents, so run it for a full hour instead of 30 minutes. Do not use vinegar on systems with aluminum components. The acid attacks aluminum. Check your collector and piping material first. Stainless steel and copper are safe.
What happens if I skip maintenance for a few years?
The fluid darkens and becomes acidic. Scale builds up in the heat exchanger. The pump works harder and eventually fails. The pressure relief valve corrodes and sticks. In the worst case, the collector overheats and the glycol turns into a tar-like substance that requires replacing the entire collector loop. That repair costs more than a decade of regular maintenance.
Do solar water heaters need maintenance in winter?
Yes, but the focus shifts. Check the antifreeze concentration before the first hard freeze. Make sure the pump runs during sunny days even when you are not using hot water, to prevent stagnation. If you have a drain-back system, verify the sensors trigger the drain cycle correctly. A single night below freezing with water trapped in the collector can crack the absorber plate.
Why is my solar water heater not producing enough hot water?
Check three things in order. First, the fluid level in the loop. Low fluid means poor heat transfer. Second, the pump operation. A pump that runs but moves little water has a clogged impeller or a stuck check valve. Third, the collector glass for dirt or debris. A thick layer of dust can cut solar gain by 15 percent. Wash the glass with a soft brush and mild soap twice a year.
Mistakes That Shorten System Life
Three errors cause most premature failures. Avoid them and your system will outlast its warranty.
Mistake one: using tap water for refills. Tap water introduces calcium and magnesium into the loop. These minerals precipitate out when the fluid heats, forming scale that is nearly impossible to remove once baked on. Always use distilled water for the final rinse and for topping off the fluid level.
Mistake two: ignoring small leaks. A tiny drip at a fitting looks harmless. It is not. The fluid loss lowers the system pressure, which causes the pump to cavitate. Cavitation wears out the impeller and bearings quickly. Fix any leak immediately, even if it means draining the loop and refilling.
Mistake three: over-tightening fittings. Hand-tight plus a quarter turn is enough for most compression fittings. Cranking them with a wrench strips the threads or cracks the ferrule. You end up with a leak that gets worse the harder you try to fix it. Use a torque wrench if you are unsure.
What to Do With This Information
Your solar water heater is a long-term investment. A few hours of maintenance each year keeps it running at peak efficiency and prevents the expensive failures that send people back to gas or electric tanks. Start with the flush kit, do the inspections on schedule, and you will get another decade of hot water out of the system you already own.