You wake up to lukewarm water or hear rumbling sounds from the basement. That’s sediment buildup inside your AO Smith water heater. Draining it every year is the fix, but most homeowners put it off — then regret it when a heating element fails or the tank starts leaking.
This guide walks you through the exact procedure for draining your AO Smith water heater. You’ll learn what tools you need, how to avoid common mistakes, and what to do with the old water. No fluff. Just the steps that actually work.

ATEEfaee
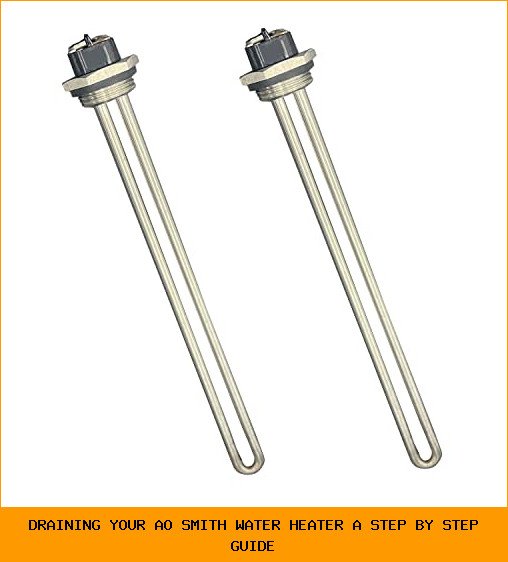
Upgraded 100108283 Water Heater Element 2 pack
- ✅[Perfect Replacement] 100108283 heater element meet original factory standards. We have tested it tens of thousands of times and…
- ✅[Comapatible] 100108283 heater element, Screw-In 4500W 240V, replaces 100108284 9000092015 heating element, fits for AO Smith Ele…
- ✅[High Quality] The heating element is made of high quality materials that can withstand higher temperatures, resist corrosion and…
If you run into a dead heating element during the process — and it happens more often than you’d think — Upgraded 100108283 Water Heater Element, For AO Smith Electric Water Heaters, 4500W 240V Screw-In from ATEEfaee is a solid replacement. It’s built to handle mineral scale and fits the standard screw-in port on most AO Smith electric models. Pull the old one, thread this one in, and you’re back to hot showers in under 30 minutes.
Why You Need to Drain Your AO Smith Water Heater
Hard water leaves calcium and magnesium deposits at the tank bottom. Over a year, that layer can reach two inches thick. That layer insulates the water from the burner or element. The heater runs longer, uses more electricity, and wears out faster.
Sediment also traps hot water against the tank floor. That leads to overheating and, eventually, a cracked tank. A new water heater costs $800 to $1,500. Draining costs you an hour and a garden hose.
Most manufacturers — AO Smith included — recommend flushing the tank once a year. If you have very hard water (over 10 grains per gallon), do it every six months. Skip it and you’ll shorten the heater’s life by years.
What You’ll Need Before Starting
Gather these items before you touch any valves:
- A standard garden hose, at least 10 feet long
- A bucket or two
- An adjustable wrench or channel-lock pliers
- A flathead screwdriver (for pilot lights on gas models)
- A socket wrench if you plan to remove the heating element for cleaning or replacement
- A pair of work gloves — the water will be hot
That’s it. You don’t need a special flushing kit. A standard hose fitting works on most AO Smith drain valves. If your valve is plastic, be careful not to overtighten the hose — the threads strip easily.
Step-by-Step Instructions for Draining Your AO Smith Water Heater
Step 1: Turn Off the Power or Gas
For electric heaters: flip the breaker that feeds the water heater. Do this even if you’re not touching the elements. Water conducts electricity. A live element in a partially drained tank can electrocute you.
For gas heaters: turn the gas control knob to “Pilot” or “Off.” Wait five minutes for the pilot flame to cool and any residual gas to clear.
Step 2: Let the Water Cool (Partially)
Hot water expands and pressurizes the tank. You don’t need ice-cold water, but letting it sit for 2–3 hours after shutting off the power drops the temperature to a safe level — below 120°F. Open a hot water faucet upstairs to relieve pressure and let air into the system.
Step 3: Connect the Hose and Open the Drain Valve
Attach your garden hose to the drain valve near the bottom of the tank. Run the other end to a floor drain, a sump pit, or outside. If you’re draining into a bucket, use a short hose and dump the bucket every few minutes — the volume is 40 to 60 gallons.
Open the drain valve by turning it counterclockwise. If it doesn’t start flowing, the valve may be clogged with sediment. Try tapping it gently with a wrench handle to break up the blockage.
Step 4: Flush the Sediment
Once the tank is half empty, close the drain valve and open the cold water supply valve for 10 seconds. This stirs up settled sediment that didn’t drain out. Then close the supply valve and open the drain again. Repeat this cycle three or four times until the water runs clear.
Sediment often looks like sandy grit or tan-colored mud. If you see chunks larger than a pea, your heater has serious buildup. Consider removing the lower heating element (on electric models) to vacuum out the bottom manually.
Step 5: Remove and Inspect the Heating Element (for Electric Heaters)
With the tank empty, you have easy access to the lower element. The ATEEfaee 100108283 replacement element screws directly into the same port. Before you install a new one, check the old element for scale buildup or burn marks. A white crusty coating means you’ve been running hard water. Clean it off with a wire brush if you plan to reuse it, but I always suggest replacing it while you’re in there — it’s cheap insurance.
Step 6: Close Everything and Refill
Close the drain valve firmly. Remove the garden hose. Open the cold water supply valve all the way. Let the tank fill completely — you’ll know it’s full when water flows steadily from the upstairs hot water faucet you left open. Then close that faucet.
For gas heaters, relight the pilot according to the manufacturer’s instructions. For electric heaters, wait until the tank is full before flipping the breaker back on. Running an element in an empty tank destroys it in seconds.
Drain Valve Types: How to Handle Each One
AO Smith uses different drain valves depending on the model year. Here’s how they compare:
| Valve Type | How to Open | Common Problem | Best Fix |
|---|---|---|---|
| Standard brass gate | Turn counterclockwise with a wrench | Hard to turn after years of inaction | Use penetrating oil (WD-40) and wait 15 minutes |
| Plastic threaded | Hand-turn or gentle pliers | Strips easily — cross-thread risk | Always use Teflon tape and hand-tighten only |
| Full-port ball valve | Quarter-turn lever | Lever breaks if forced frozen | Replace with a brass ball valve from a hardware store |
If your drain valve is plastic and you strip the threads, you can replace it with a brass nipple and a ball valve for about $10. That’s a much more durable setup for future flushes.
When to Replace Parts During a Drain
You don’t have to replace anything every time you drain. But if you notice any of these signs, do it now rather than wait for a mid-week emergency:
- Lower heating element is covered in white scale. That scale reduces heat transfer. Replace it with the ATEEfaee 100108283 element — it’s a direct fit for AO Smith electric models and includes a new gasket.
- Drain valve drips after closing. A new brass valve costs less than $15 and takes 10 minutes to swap.
- Anode rod is less than 1/2 inch thick or covered in deep pits. A sacrificial anode protects the tank from rust. Replace it every 3–5 years, but if you see heavy corrosion, do it immediately.
- Rubber gasket on the element looks cracked or flattened. Always use the new gasket that comes with the replacement element — reusing an old gasket almost guarantees a slow leak.
Frequently Asked Questions About Draining AO Smith Water Heaters
How often should I drain my AO Smith water heater?
At least once a year. If your water hardness is above 10 grains per gallon, drain every six months. The longer you wait, the more sediment packs at the bottom. That packed sediment turns into rock-hard deposits that won’t flush out.
What happens if I never drain my water heater?
Sediment builds up, the heater becomes less efficient, and the bottom of the tank can overheat and crack. A corroded tank leaks. Most water heater failures after 8–10 years are caused by internal rust, not by a faulty element or thermostat. Regular draining prevents that.
Can I drain my water heater without a hose?
Technically yes, but it’s messy. Open the drain valve and let water splash into a bucket. You’ll need to empty that bucket every few minutes. For a 40-gallon heater, expect 8 to 10 bucket trips. A garden hose is far easier.
Why is no water coming out of the drain valve?
Two common reasons: the valve is clogged with sediment, or there’s no air entering the tank. Open a hot water faucet somewhere above the heater to break the vacuum. If that doesn’t work, tap the drain valve lightly with a wrench to dislodge the plug. Still nothing? The valve may be completely blocked. You can remove the valve stem and poke a wire into the opening — but expect a burst of water when it clears.
Should I drain the water heater if I’m going on vacation?
No — draining for a week-long trip is unnecessary. Instead, set the thermostat to “Vacation” or the lowest setting and turn off the water supply to the heater. Draining for more than a few days can let dry air inside, which accelerates rust on exposed metal surfaces.
What to Do After Draining: Quick Checks
You did the work. Now make sure everything’s solid before you walk away:
- Check all connections for leaks — drain valve, element gasket, supply lines.
- Listen for rumbling after the heater fires back up. If you still hear it, you have internal sediment that didn’t flush out. Try a second flush with more aggressive agitation (open the cold inlet full blast for a few seconds).
- Feel the hot water at the tap. If it’s not as hot as before, the thermostat may need adjustment or the upper element could be failing.
- Mark the date on a sticky note and stick it to the tank. Next year you’ll know exactly when to do it again.


