You walk into the basement and hear it — a steady splash. Your water heater burst while you were at work. Water spreads across the floor, soaks your storage, creeps toward the furnace. The damage is measured in thousands, not hundreds, by the time you get the water shut off.
I’ve talked to homeowners who thought their tank had years left. They flushed the valve once, maybe twice. They had no idea sediment was slowly cooking the bottom out of their tank until it gave way. This article will show you exactly how a water heater burst happens, what role sediment plays, and what you can actually do to stop yours from failing.

SEDIMENT GONE
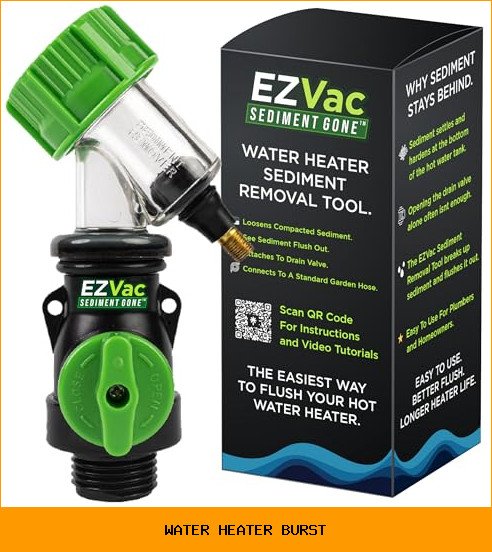
The Original Sediment Gone™ Water Heater Flush Kit & Sediment Removal Tool | DIY hot water heater flush kit, NO plumber needed, Gas or electric tanks, clear window to watch Sediment flush out, 3/4 NPT
- WATER HEATER SEDIMENT REMOVAL TOOL – The Sediment Gone hot water heater flush kit is designed to stir, loosen, and flush out stubb…
- HOW IT WORKS – The Sediment Gone Tool threads onto the water heater drain valve and connects to a standard garden hose for control…
- BENEFITS OF REMOVING SEDIMENT – Flushing out sediment helps maintain heating efficiency, improve water quality, reduce the risk of…
You’ll walk away with a clear prevention plan, a practical tool that fixes the root cause, and a list of warning signs most people ignore.
One of the smartest investments I’ve seen for this problem is the Sediment Gone Water Heater Sediment Removal Tool (ASIN B0G674JLLB). It attaches to your drain valve and uses short bursts of air from a bicycle pump to stir up hardened sediment that gravity alone can’t budge. A transparent window lets you see the grit pouring out — no guessing. It’s a simple fix for the leading cause of water heater burst.
Why a Water Heater Burst Happens (It’s Not What Most People Think)
Most people assume a water heater burst is caused by old age. Age is a factor, sure. But the real trigger is pressure. Your tank is designed to hold about 150 PSI steady. The temperature-pressure relief (TPR) valve opens at 150 PSI or 210°F to prevent explosion. But here’s the thing — that valve can fail if sediment blocks it.
Sediment collects at the bottom of the tank over months and years. It’s mostly calcium carbonate, magnesium, and sand from your water supply. As the burner fires (gas) or the elements heat (electric), that sediment layer insulates the bottom of the tank. The steel gets hotter than it should. Repeated thermal stress weakens the metal. Cracks form. Eventually, the bottom blows out. That’s your water heater burst.
I’ve seen tanks only six years old fail this way. The manufacturer’s rating might be 10–15 years, but sediment cuts that in half if you never flush it.
How Sediment Builds Up and Destroys Your Tank From the Inside
Think about your water heater like a kettle that runs constantly. Every pint of water that enters the tank carries dissolved minerals. Hot water is worse at holding minerals in solution, so they precipitate out and settle. The volume is small per gallon, but over time it adds up.
For a 50-gallon tank with moderately hard water (7–10 grains per gallon), you’re looking at roughly one to two pounds of sediment per year if you never flush. That might not sound like a lot. But that layer sits right where the heat source is. On an electric heater, the bottom element is buried in that sludge. The element has to work harder, so it burns out faster. On a gas heater, the combustion chamber underneath gets hotter than normal, which can warp the tank bottom.
The TPR valve sits near the top of the tank. Sediment can travel up and clog the valve’s inlet, so it never opens when pressure spikes. That means your water heater burst isn’t just possible — it’s more likely because the safety device is disabled.
The Two Ways to Deal With Sediment — And Why One Actually Works
Standard advice is to drain a few gallons from the tank every six months. That’s okay for preventing a new layer of loose sediment from settling. But it does almost nothing for the hardened crust that’s already stuck to the bottom. Gravity pulls water out of the open valve, but the compacted material doesn’t move. You’re just watching clear water run while the real problem stays put.
That’s why the Sediment Gone tool makes sense. It threads onto your drain valve, connects to a garden hose, and lets you pump short bursts of air back into the tank while draining. The agitation breaks up compacted sediment the way knocking on a jar loosens stuck peanut butter. The transparent window confirms you’re actually getting the junk out. A few pumps and you’ll see brown, gritty water streaming through the hose.
Here is a direct comparison of the common approaches:
| Method | What It Does | Effectiveness on Hardened Sediment | Risk Level | Time Required |
|---|---|---|---|---|
| Standard drain flush | Open valve, let water run | Very low — leaves compacted layer in place | Low (if done correctly) | 15 minutes |
| Professional power flush | Uses a pump to force high-pressure water through tank | High — can dislodge most sediment | Moderate (can damage old tank if pressure too high) | 1–2 hours plus service call |
| Sediment Gone tool (air agitation) | Air bursts break up sediment while draining | High — visible results from compacted buildup | Low — uses existing valve, no high pressure | 20–30 minutes |
| Chemical descaler | Acid or other chemicals circulated in tank | Moderate — works best on light scale, not thick crust | High — can damage anode rod, must neutralize afterward | 2–4 hours |
I’ve used the air agitation method myself. The first time, I pulled out about a cup of gritty sludge from a five-year-old tank. The next year, much less. That tells me it’s actually working.
When You Need to Take Action — The Warning Signs
You can’t always predict a water heater burst. But you can spot the conditions that lead to one. Look for these:
- Popping or rumbling sounds during heating. That’s steam bubbles trapped under sediment.
- Rusty water from hot taps. Indicates corrosion inside the tank.
- Tepid water even when the setting is normal. Sediment is insulating the burner or element.
- Moisture or puddling near the base of the tank. Small leaks often precede a full rupture.
- The pressure relief valve leaks or drips regularly. That means pressure is building and the valve is reacting — but if it’s stuck, pressure will keep rising.
If you see any of these, check the age and the bottom of the tank. Stick a flashlight behind the access panel if you can. If the floor is damp or the jacket is rusted, you might have days or weeks before a catastrophic failure. The Sediment Gone tool can still help flush out the cause, but if the tank is already compromised, replacement is the safer call.
Real Questions People Ask About Water Heater Burst
Can a water heater burst suddenly without warning?
Yes, it can. The bottom can rupture in seconds if the metal has been weakened over years. But most tanks show symptoms first. The popping noise, small leaks, or inconsistent temperature are signs. Many homeowners dismiss them as normal until the floor gets wet. That’s why I tell people to inspect their tank every six months, not just when something goes wrong.
How much does a water heater explosion cost in damages?
A full water heater burst can dump 40 to 80 gallons of water in minutes. If it’s upstairs, that water soaks through ceilings, walls, flooring, and personal belongings. Typical insurance claims run from $5,000 to over $20,000 depending on the extent of water damage and mold remediation. A burst in a basement might be less destructive but still involve flooded storage, drywall, and carpet. The cost of a replacement tank plus installation is usually between $1,000 and $2,000. The Sediment Gone tool is under $50. The math is clear.
Is it safe to use a sediment removal tool on any water heater?
Most residential electric and gas water heaters have a standard 3/4-inch drain valve, and the Sediment Gone tool is designed to fit those. It uses low-pressure air from a hand or bicycle pump — nothing that would damage the tank or the plumbing. The one caveat is if your valve is corroded or broken. If you try to turn it and it leaks or won’t close, you’ll need to replace the valve first. That’s rare, but possible on older tanks.
How often should you flush a water heater to prevent a burst?
Manufacturers usually recommend every six months. I push for once a year minimum, and every three months if your water is hard (over 8 grains per gallon). Flushing with agitation (like the Sediment Gone tool) once a year is far more effective than draining a few gallons every three months without it. The key is removing the hardened layer, not just the loose stuff.
What happens if the pressure relief valve fails during a burst?
If the TPR valve is clogged or stuck shut and the water heater burst happens due to overpressure, the tank can rupture violently. It’s called a steam explosion. When the tank fails at high pressure, the metal tears open and releases a blast of scalding water and steam. It can throw the tank through a wall. This is extremely rare, but it’s the worst-case scenario. That’s why you test your TPR valve once a year by lifting the lever and letting it snap back. If it doesn’t seal afterward, replace it immediately.
What You Should Actually Do Starting Today
- Find your water heater and read the data plate. Write down the year it was made. If it’s over 10 years old and never been flushed, consider replacing it soon.
- Test the TPR valve. Lift the lever and listen for a gurgle. Let it snap back. If no water comes out or it keeps leaking, get a new valve.
- Pick up the Sediment Gone tool. It’s cheap insurance against the leading cause of a water heater burst. The transparent window and air pump method actually get the crust out.
- Schedule a flush with the tool. You’ll need a garden hose, a bicycle pump, and about 30 minutes. Do it when the tank is off and has cooled for a few hours.
- Set your thermostat to 120–125°F. Higher temperatures accelerate sediment formation and increase stress on the tank. 130°F is the absolute max without a mixing valve.
- Install a water softener if your hardness is above 10 grains per gallon. Soft water dramatically reduces sediment buildup. It’s a bigger upfront investment but pays for itself in appliance life.
- Inspect the area around the tank every three months. Look for moisture, rust, or corrosion on the fittings. A small puddle now could save you from a flooded basement later.


