It’s 6:30 AM. You’re standing in front of the water heater, coffee in hand, and there it is again: a high-pitched chirp or a steady beep. The unit isn’t leaking. The pilot light looks fine. But the noise won’t stop, and it’s starting to get under your skin.
That beep is the control board’s way of telling you something specific. It’s not random. It’s not a glitch. On most modern gas water heaters, a beeping code points to one of a handful of fault conditions, and the most common one is a failed flammable vapor sensor. This article walks you through the likely culprits, how to read the codes, and exactly what to do about each one.

Holdly
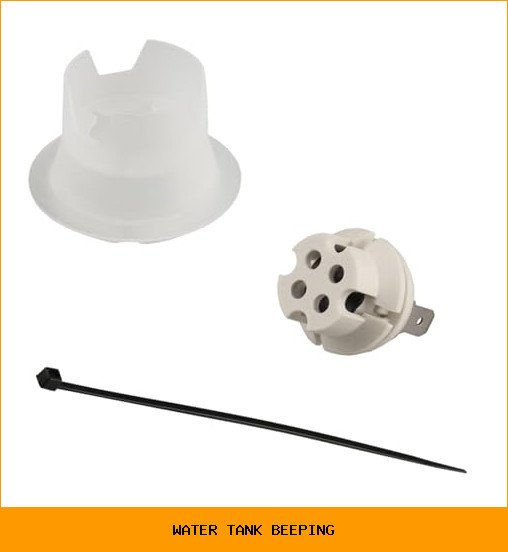
SP20172 Flammable Vapor FV Sensor Kit | AP13447-3 - 25VS | Water Heater Flammable Vapor Sensor Replacement Parts for Rheem, Ruud, Richmond FVIR Water Heaters
- The kit includes a Flammable Vapor Sensor (AP13447-3 - 25VS), a Cap Plug, and a Wire Tie. It is compatible with Rheem (Ruud, Richm…
- Flammable vapor sensor film: Capable of quickly reacting to gasoline vapors in the surrounding air of the water heater, causing a…
- Quick response: Upon detecting a leak, it quickly triggers the control module to shut off the gas supply to the water heater and p…
By the end, you’ll know whether you can fix it yourself in 20 minutes or whether you need to call a plumber. You’ll also know why that sensor fails, how to test it, and what to look for when buying a replacement.
If your water heater is a Rheem, Ruud, or Richmond model from the last 15 years, the beeping is almost always tied to the FVIR (Flammable Vapor Ignition Resistance) system. The Holdly SP20172 Flammable Vapor Sensor Kit replaces the faulty sensor and includes the cap plug and wire tie you need to finish the job. It’s a direct swap for the AP13447-3 – 25VS sensor used in many of those units. More on compatibility later.
First, Decode the Beep Pattern
Before you buy anything or take the cover off, listen carefully. The pattern matters. Most control modules use a combination of short and long beeps, or a specific number of beeps in a row, to signal a fault code.
On most Rheem and Ruud models, the sequence repeats every few seconds. A single beep every 5 seconds often means the flammable vapor sensor has detected a problem. Two beeps might indicate a thermistor issue. Three or four beeps usually point to a temperature sensor or gas valve fault. Check the sticker on the side of your tank or the back of the access panel — it lists the exact code chart for your model.
If you don’t see a sticker, look up the model number online. The number is on the rating plate near the gas valve. Write it down before you call anyone or order parts. You’ll need it for compatibility anyway.
The Flammable Vapor Sensor: The Usual Suspect
Since 2026, gas water heaters sold in the U.S. have been required to resist ignition from flammable vapors. That’s a fancy way of saying the unit must not ignite gasoline fumes or paint thinner vapors that might be present in a garage or utility room. The flammable vapor sensor is the watchdog for that system.
The sensor sits near the bottom of the water heater, usually behind a small access door. It contains a thin film that changes electrical resistance when it comes into contact with certain hydrocarbon vapors. When the resistance changes enough, the control module shuts off the gas supply and starts beeping. The idea is simple: if there’s gasoline vapor in the air, the last thing you want is a burner flame.
Here’s the catch. The sensor doesn’t just react to real gasoline leaks. It can fail over time due to normal aging, dust buildup, or exposure to common household chemicals like paint fumes, aerosol sprays, or even some cleaning products. Once the film degrades or gets contaminated, the resistance reading goes out of range, and the control board interprets that as a vapor event. The gas shuts off, the beeping starts, and you’re left with cold water.
In my experience, a sensor that fails this way is simply worn out. It’s not detecting a real danger. It’s just old. Most manufacturers recommend replacing the sensor every 5 to 7 years as preventive maintenance, but plenty of units go longer. If your water heater is beeping and you haven’t spilled gasoline anywhere near it, a failed sensor is the most likely cause.
How to Confirm It’s the Sensor and Not Something Else
You can’t just assume. A quick multimeter check takes five minutes and saves you from buying a part you don’t need.
- Turn off the gas supply and unplug the water heater from the wall outlet (if it has a power cord). If it’s hardwired, flip the breaker.
- Remove the bottom access panel. The sensor is usually a small plastic cartridge with two wires running to it, mounted near the burner chamber.
- Disconnect the two wires from the sensor terminals.
- Set your multimeter to measure resistance (ohms). Touch the probes to the two sensor terminals.
A healthy sensor at room temperature should read somewhere between 500 and 1,500 ohms, depending on the specific model. A failed sensor often reads as an open circuit (infinite resistance) or a dead short (near zero). Some sensors fail intermittently, so if you get a reading that seems reasonable, gently tap the sensor and see if the resistance jumps around. If it does, the sensor is faulty.
If the sensor reads fine, the problem might be the control module itself. That’s a more expensive repair and usually worth doing only if the water heater is relatively new. On an older unit, the cost of a new control board often exceeds the value of the tank.
Replacing the Sensor: A 20-Minute Job
Replacing the sensor is straightforward, but you need to follow the steps in order. The gas valve must be off, and you should wait a few minutes for any residual gas to dissipate before you open anything up.
- Turn the gas control valve to the OFF position.
- Remove the access panel and any insulation covering the sensor.
- Unplug the two wires from the old sensor.
- Pull the old sensor out of its mounting clip. It’s usually held in by friction or a small tab.
- Insert the new sensor from the Holdly kit into the same clip. Make sure it’s seated firmly.
- Reconnect the wires. Polarity doesn’t matter for this sensor — either wire can go on either terminal.
- Replace the insulation and the access panel.
- Turn the gas back on and relight the pilot according to the instructions on the water heater.
One thing to watch: some models require the control module to be reset after a sensor replacement. That usually means pressing and holding the reset button on the gas valve for 5 seconds, or cycling the power. Check your owner’s manual. If you don’t have it, the steps are often printed on the inside of the access panel.
After the reset, the beeping should stop immediately. If it doesn’t, the control module is likely bad, and that’s a bigger job.
Other Causes of Beeping Worth Ruling Out
Not every beep is a sensor failure. Here are the other common culprits, in order of likelihood.
Thermistor failure. The thermistor measures water temperature and sends that reading to the control board. If it shorts out or opens up, the board doesn’t know the tank temperature and goes into fault mode. The thermistor is usually a small probe that inserts into the tank wall near the bottom. It’s cheap to replace and easy to test with a multimeter — a good thermistor reads around 10,000 ohms at room temperature.
Draft hood switch. Some models have a switch that verifies proper venting. If the vent is partially blocked or the switch itself fails, the heater will beep to alert you. Check for bird nests or debris in the vent pipe first. The switch itself is a simple on/off device; test it for continuity with a multimeter.
Gas pressure issues. Low gas pressure can cause the burner to fail to ignite repeatedly. The control board tries three times, then locks out and beeps. This is less common, but if you’ve already replaced the sensor and the thermistor, check the gas line pressure with a manometer. That’s a job for a professional unless you have the tools and experience.
Water leaks near the base. A slow leak from the tank or a fitting can drip onto the burner assembly and cause intermittent faults. Inspect the area around the base of the tank for rust streaks or dampness. If the tank itself is leaking, replacement is the only option — don’t waste time and money on parts.
Sensor Replacement vs. New Water Heater: A Quick Comparison
| Situation | Sensor Replacement | New Water Heater |
|---|---|---|
| Water heater age | Under 8 years old | Over 12 years old |
| Sensor reading | Open circuit or out of range | Not the issue; tank leaks or rusted |
| Cost | Parts only ($20–$60) | $800–$1,500 installed |
| Time to fix | 20–30 minutes | Half a day |
| Skill level | Beginner with a screwdriver | Requires plumber |
The math is pretty clear. If your tank is under 8 years old and the only problem is a beeping sensor, replace the sensor. If the tank is approaching or past the 12-year mark, the beep might be a sign of bigger issues. A new unit costs more upfront but comes with a fresh warranty and better efficiency.
Five Real Questions People Ask
Can I just unplug the water heater to stop the beeping?
You can, but it won’t fix anything. Unplugging the unit resets the control module temporarily. The beeping will stop for a few hours, then come back once the module re-runs its self-check and finds the same fault. It’s a diagnostic step, not a solution. If you unplug it and the beep returns within 24 hours, you’ve confirmed a persistent fault condition.
Is it safe to keep using the water heater while it beeps?
If the beep is tied to the flammable vapor sensor, the gas supply is already shut off. The unit won’t heat water until the fault is cleared. That’s a safety feature, not a nuisance. If the beep is from a thermistor fault, the burner might still fire but at the wrong temperature, which can overheat the tank. Either way, don’t ignore it. The water heater is telling you it can’t operate safely.
Why does my water heater beep after a power outage?
Power outages cause the control module to lose its settings and run a startup diagnostic. If a sensor is marginal, the diagnostic fails and triggers the beep. In many cases, simply pressing the reset button on the gas valve clears it. If it beeps again within a few days, the sensor is likely failing and should be replaced.
Will a universal sensor work on my Rheem water heater?
Some universal sensors work, but they’re not worth the risk. The resistance curve and mounting style vary between manufacturers. A sensor meant for a different brand might fit physically but give false readings, which means either constant beeping or, worse, no beeping when there’s a real vapor leak. Stick with a sensor that’s specifically listed for your model family, like the Holdly SP20172 for Rheem, Ruud, and Richmond units.
How much does a plumber charge to replace a sensor?
Most plumbers charge a flat service call fee, usually $100 to $200, plus the cost of the part. The part itself is cheap — often under $50. The labor is where the cost adds up. Since the job takes about 20 minutes, you’re paying mostly for the trip and the expertise. If you’re comfortable with a screwdriver and a multimeter, this is one repair that’s genuinely DIY-friendly.
What to Do Next: A Practical Checklist
- Listen to the beep pattern and write down the number of beeps per cycle. Compare it to the code chart on the tank.
- Check the water heater’s age. If it’s over 12 years old, seriously consider replacement instead of repair.
- Test the flammable vapor sensor with a multimeter. A reading outside 500–1,500 ohms means it’s bad.
- Replace the sensor with a model-specific part like the Holdly kit if the test confirms failure.
- Reset the control module after replacement. Press and hold the reset button for 5 seconds, or cycle the power.
- If the beeping persists after a new sensor, test the thermistor and draft hood switch before calling a pro.
- Keep the area around the water heater clear of gasoline, paint thinners, and aerosol cans. That’s what the sensor is watching for.
That beeping is rarely an emergency, but it’s always a warning. The good news is that most of the time, the fix is a $30 part and a few minutes of your time. The better news is that the system is working as designed — it’s keeping you from a potentially dangerous situation. Treat the beep as a nudge, not a crisis, and you’ll have hot water running again before lunch.


